Sew Easy! Craft Your Own Chic Stretchy Twisted Headband in Minutes and a Giveaway

Beautiful woman modeling DIY Stretchy Twisted Headband horizontal

With spring’s arrival, are you gearing up for more time outdoors, tending to your garden or enjoying the sunshine, and you’re in need of a stylish way to keep those locks out of your beautiful face? Look no further! I’ve got just the thing—a fun, easy-to-follow guide on how to sew your very own stretchy twisted headband.

At first glance, it might seem a bit tricky, but trust me, it’s incredibly simple! All it takes is sewing two straight seams. That’s it!

AND…

I’m thrilled to announce that I’ll be gifting one of these stylish twisted headbands to one of you! 🌟 To enter the giveaway, simply head over to my Instagram, and/or Youtube enjoy the tutorial video, and show some love by tapping the heart. 💖 And if you’re in the giving spirit, sharing the post would mean the world to me. Let me know in the comments below how you spread the love and I’ll put your name into the hat.

Your support fuels my creative journey, and I sincerely hope my tutorials bring value and inspiration to your life. Thank you for being part of this adventure!

Beautiful woman modeling DIY Stretchy Twisted Headband vertical view

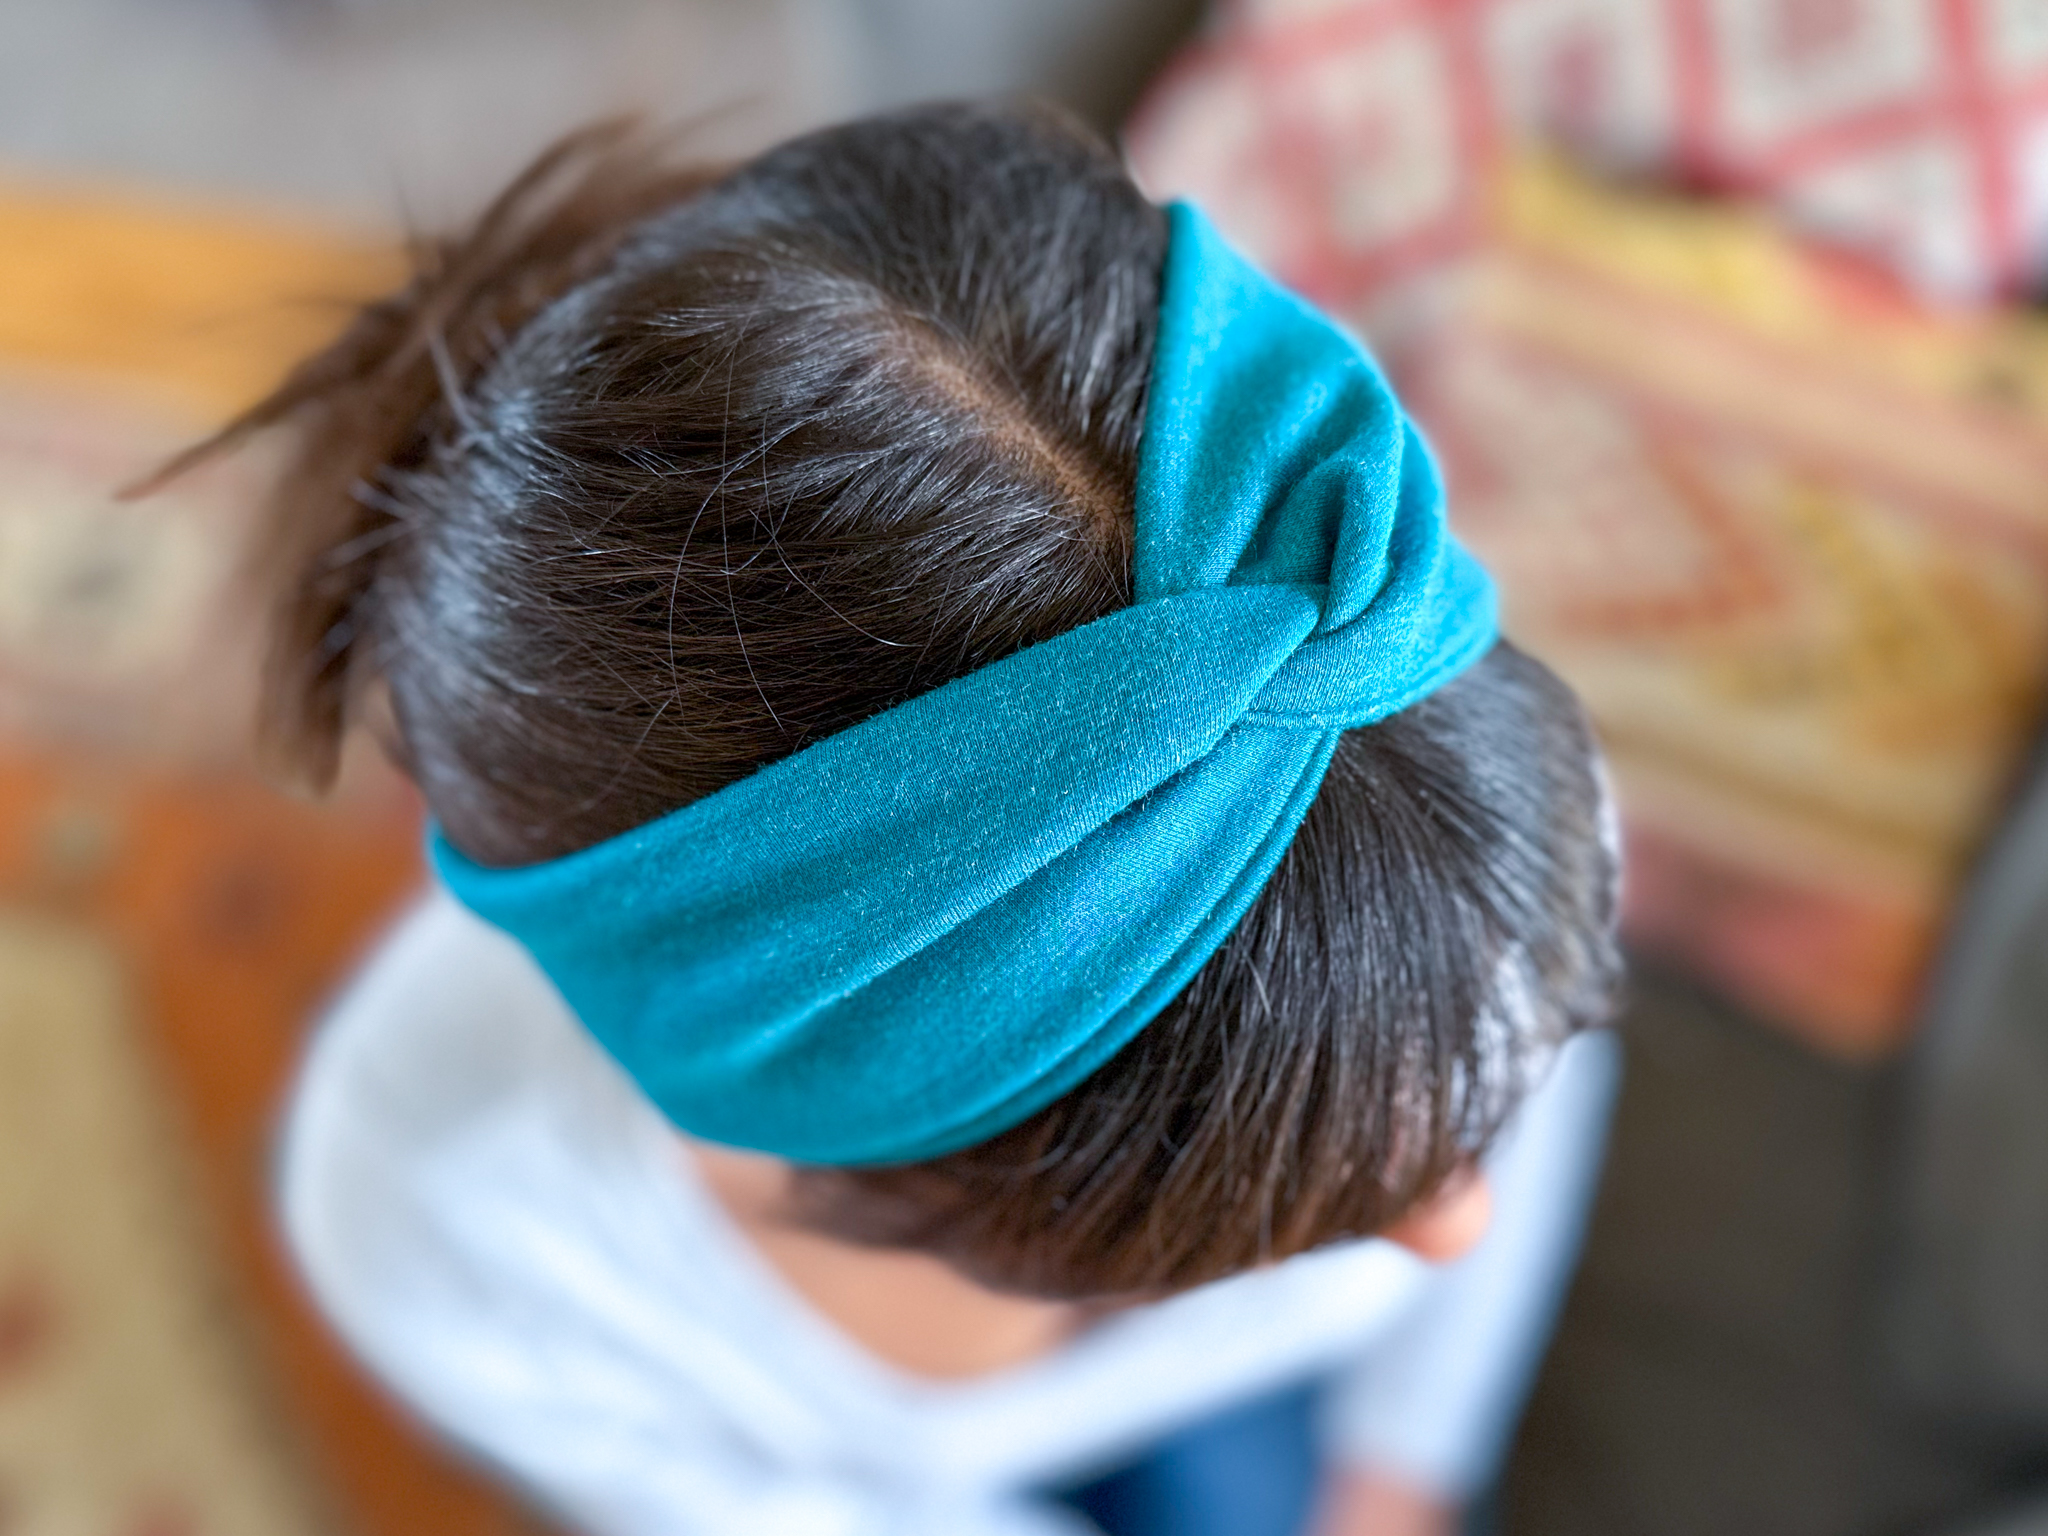
And for the icing on the cake, my gracious and beautiful friend Jessica has kindly modeled my creation, showcasing the headband’s versatility and charm. Whether you’re tackling a garden project or simply looking for a chic solution to manage your mane, click here to join us in this crafty adventure and discover how to create a headpiece that’s both practical and pretty!

Beautiful woman modeling DIY Stretchy Twisted Headband horizontal

Watch the Youtube video here:

Or check out the Instagram version here:

Finished twisted headband
Beautiful woman wearing twisted headband

For more sewing, refashioning and crafting tutorials or inspiration, click here.

Happy sewing!

Beth

aka

The Renegade Seamstress

Posted in Crafting, DIY, Giveaway, Sewing, Tutorial | Tagged , , , , , , , , , , | 3 Comments

DIY Sun-Savvy Tote: How to Craft a Stylish Bag with Built-In Hat Holder and Happy Birthday Katie!

Overhead view of a stylish sun hat neatly tucked into a handmade tote bag, perfectly arranged for a chic summer outing.

Honestly, how have I lived without this bag? My gorgeous hat from the Aloha Hat Company in Lahaina, Hawaii (yes, it took me three tries to find the perfect one) fits like a dream in it. Looks like I have the perfect excuse to jet off to Hawaii and Mexico again, just to show off this super convenient hat-carrying tote!

Side view of a stylish sun hat neatly tucked into a handmade tote bag, perfectly arranged for a chic summer outing.

Creating these how-to videos for you, is always such a pleasure and this one is no exception. I hope you enjoy watching it as much as I enjoyed producing it:

Speaking of Hawaii: Three years ago today, we were basking in the Hawaiian sun, celebrating the birthday of my incredible daughter, adorned in her perfect hat. Let’s shower her with love and wishes on this special day. Happy Birthday to my beautiful girl! 🎉🌺

Close-up image of my daughter smiling brightly in Lahaina, Hawaii, her face shaded by her perfect sun hat, capturing a moment of pure joy and island beauty.
Photo of my radiant daughter donning her sun hat and her husband, both beaming with happiness in Hawaii, as they are on their way to her birthday dinner celebration.

You can read the entire step-by-step photo tutorial here.

Overhead view of a stylish sun hat neatly tucked into a handmade tote bag, perfectly arranged for a chic summer outing.

And a big “Thank You” to Shannon, for showing up just in time with the perfect shoes for a photo shoot!

A woman strolls along, her black strappy shoes clicking softly, as she carries a stylish sun hat tote bag, showcasing the perfect blend of functionality and summer fashion

Crafting your own dual-purpose tote bag that stylishly secures your sun hat isn’t just a creative project—it’s a practical solution for every sun lover out there.

With steps so straightforward even my sister Jan, could master this DIY with ease.

And let’s not forget a heartfelt mahalo to the Aloha Hat Company in Lahaina, where the quest for the perfect hat inspired this whole endeavor. May you be back up and making people look good soon!

So, whether you’re strolling on a beach in Hawaii or navigating the bustling streets of your hometown, this tote bag will ensure your sun hat is always by your side, ready for whatever sunny adventures lie ahead. So, grab your materials and let’s get crafting—your next must-have summer accessory awaits!

For more sewing, refashioning, and crafting inspiration and tutorials, click here.

Happy Sewing (and Vacations in the Sun)

Beth

aka

The Renegade Seamstress

Posted in DIY, Sewing, Tutorial | Tagged , , , , , , , , , , | 7 Comments

Coloring Nature’s Way: The Art of Dyeing Easter Eggs with Natural Ingredients

naturally dyed easter eggs

Excuse me, but..

would you take a look at that turquoise egg in the center!! Gasp!

Who knew that head of purple cabbage in the fridge not only tastes great in a salad but has secret Easter egg dyeing powers, as well?!!?

Welcome to my new obsession.

The art of dyeing Easter eggs with natural materials!

Get ready to dive into a world where everyday ingredients like purple cabbage, red onion skins, blueberries, cranberries, turmeric, chili powder, and beets transform into stunning hues for your egg-decorating extravaganza.

I’ve been so excited for this article/video to be published so I could share it with you.

This project holds a special place in my heart—it’s truly one of my all-time favorites. From the moment I started creating the eggs, capturing them in photographs, to experimenting with new filming techniques for the accompanying video, I was completely absorbed. Lost in the “zone” of creativity, time seemed to slip away as I immersed myself in the joy of crafting these uniquely beautiful eggs. Join me as we unlock the secrets of natural dyeing and unleash our creativity in this egg-citing adventure! I hope you enjoy watching as much as I enjoyed creating it for you.

Check out the video here:

For complete step-by-step instructions, click here.

close up of chopped cabbage
Easter eggs dyed with purple cabbage
egg carton with Easter eggs dyed using natural materials
Colorful naturally dyed Easter eggs

I’m filled with gratitude for the opportunity to explore creativity and capture the beauty of this timeless tradition. From the vibrant hues of purple cabbage to the rich tones of turmeric and beyond, each egg tells its own unique story, a testament to the wonders of nature and the joy of handmade crafts.

As you gather with loved ones to celebrate the Easter season, may these colorful eggs serve as a reminder of the simple pleasures found in creativity, community, and the beauty that surrounds us.

Wishing you all a happy and colorful Easter!

Beth

aka

The Renegade Seamstress

(Or maybe today I should be The Renegade Colorist 😂😂😂)

For more crafting, sewing, and refashioning tutorials and inspiration, click here.

Posted in Crafting, DIY, Easter, Sewing, Tutorial | Tagged , , , , , , , | 4 Comments

Go Nuts For Baking: Your Ultimate Guide to Baking Perfect Pistachio Bread

Sliced green homemade pistachio bread on a cutting board

If you’re nuts about pistachios or looking to bring a touch of green to your St. Patrick’s Day Feast, then you’re in the right place.

You could go with the traditional minty treats or rainbow-themed desserts this year, but why not surprise and delight your guests with some unexpected shenanigans? This homemade pistachio bread is not only deliciously different, but its natural green hue makes it a perfect fit for this fun-filled holiday.

But don’t think this bread is a one-hit wonder. Oh, no! Its unique flavor and undeniable charm make it a welcome addition to any table, anytime of the year. So, whether it’s a sunny summer afternoon, a crisp fall morning, or a cozy winter evening, this pistachio bread is sure to be a hit.

Watch the video:

Or, click here for the complete step-by-step pistachio bread recipe.

wooden bowl filled with pistachios

Alright, let’s talk about pistachios for a moment, turns out they’re not just delicious; they’re also incredibly good for you. They’re packed with protein, full of fiber and antioxidants and have array of nutrients—vitamin B6, potassium, copper, manganese, thiamin, phosphorous, and chromium.

And the best part? Despite all these amazing benefits, pistachios are lower in fat and calories compared to most nuts.

Just thought you might like to know this so you can feel a bit less guilty about eating this delicious bread.

shelled pistachios on a towel getting hulled
bowl full of pistachio bread ingredients
green pistachio bread batter
loaf of pistachio bread with glaze and topped with chopped pistachios
sliced green pistachio bread on a cutting board

Happy St. Patrick’s Day!

Beth

aka

The Renegade Seamstress (cook?)

For more cooking, refashioning, crafting and sewing inspiration and tutorials, click here.

Posted in baking, Cooking | Tagged , , , , , , , , | Leave a comment

Hatch a New Project: Create a Cluck-tastic Egg-Collecting Apron

Finished egg collecting apron with farm fresh eggs in the pocket and in a white bowl

You know what’s really cracking me up these days?

My lovely hens have been laying eggs like there’s no tomorrow, leaving me in a scramble (pun absolutely intended) to collect them all. It’s like an Easter hunt, but every single day. And let me tell you, my pockets just aren’t cutting it anymore.

It’s time to channel that abundance into a stylish and practical accessory for every egg-collecting endeavor. Let’s turn some delightful black and white chicken fabric into an egg-collecting apron that keeps your hands free and adds a touch of farm-fresh charm to your daily routine.

Thank you for watching the video here:

Click here for the more complete, step-by-step directions.

close up overhead view of farm fresh eggs in the pockets of an egg collecting apron
Finished egg collecting apron with farm fresh eggs in the pocket and in a white bowl

I found upon this absolutely adorable chicken fabric on Spoonflower. But, when I went to grab the link to share with you all, it had vanished. Poof! Gone! But here’s a link to some other chicken fabric you might like to use.

I hope you will now be able to strut confidently around your coop, gather those eggs in style, and enjoy the fruits of your crafting labor.

Happy sewing, and may your nests be forever plentiful!

Beth

aka

The Renegade Seamstress

Click here, for more sewing, refashioning and crafting tutorials and inspiration.

Posted in Crafting, DIY, farm life, Sewing, Tutorial, video | Tagged , , , , | 2 Comments

Sweet Love Layers: Crafting the Perfect Pink Ombre Cake Valentine Box!

As a seasoned Kindergarten teacher, my heart always fluttered for Valentine’s Day. Not because of the candy or the presents, but for the palpable excitement that filled the air as the children eagerly exchanged their little tokens of friendship.

Picture the classroom buzzing with excitement as little notes are exchanged between tiny hands, creating a symphony of happiness. This year, why not add an extra sprinkle of fun to that tradition?

Let’s layer up the love and craft the perfect Pink Ombre Cake Valentine Box!

It’s not just a box; it’s a delightful confection of friendship, ready to be filled with all those heartfelt notes. So, roll up your sleeves and preheat your creativity – it’s time to bake up some love!

Finished Pink Ombre Cake Valentine Box with a hand inserting a Valentine card into the top slot

Grab a round cardboard box with a lid. A dear friend, Linda, stumbled upon this gem for me at a yard sale a few years ago, and it’s been eagerly biding its time on my shelf, awaiting its grand debut. If you’re not lucky enough to have one lounging around, fret not – craft stores usually stock these items for your creative endeavors.

The only other things you’ll need to make this Valentine box are a few rolls of crepe paper streamers, sharp scissors, a hot glue gun, and a utility knife.

materials needed for a Pink Ombre Cake Valentine Box

Watch the video here:

Or, click here for the complete, step-by-step, tutorial.

fringed pink crepe paper streamers
Finished Pink Ombre Cake Valentine Box with a hand inserting a Valentine card into the top

For me, as a teacher, Valentine’s Day has always held a special place in my heart. It’s not just a school holiday; it’s a celebration of friendship and caring that transforms a classroom into a haven of warmth.

This DIY venture isn’t merely about crafting a beautiful box; it’s a reflection of the sentiments that make Valentine’s Day truly extraordinary. As you embark on sharing and exchanging little tokens of affection, may this handmade creation symbolize the joy of connections and the sweetness of genuine friendship.

Happy crafting, and may your Valentine’s Day be as heartwarming as the memories we’ve created together!

Beth

aka

The Renegade Seamstress

Posted in Crafting, DIY, friends, gifts, Sewing, Tutorial, Valentine's Day, video | Tagged , , , | Leave a comment

Time-Traveling DIY: Recreating the 1962 Foldout Barbie Dream House from a Cardboard Box!

Decorated living room of a cardboard fold-out Barbie house

“What’s this, Beth? Another dollhouse in the works?”

Yep! I had an absolute blast creating this foldout cardboard Barbie house—like, WAYYYYYYY too much fun. It’s starting to dawn on me; I might be regressing back into my childhood years. But hey, does that surprise anyone?

Raise your hand if you remember the foldout cardboard dollhouse made especially for Barbie in 1962, complete with mid-century modern cardboard furniture?

Inside of a 1962 fold-out cardboard Barbie house with cardboard furniture
Side view of a 1962 cardboard fold-out Barbie house
1962 cardboard fold-out Barbie house


What an ingenious concept! Not only is it cool, but it also serves as a practical storage solution for dollhouse furniture. Let’s take inspiration from their brilliant idea of a cardboard foldout dollhouse and give it a modern twist using a recycled cardboard box, foam board, fabric, and wallpaper samples.

Front of a modern cardboard fold-out Barbie house based on the 1962 version

Welcome to my version of the cardboard foldout Barbie Dream House.

Inside of a modern cardboard fold-out Barbie house based on the 1962 version

Watch the how-to video here:

Click here for the complete (and much slower :)) step-by-step photo tutorial.

Time to decorate the kitchen:

Close up of the kitchen in a modern cardboard fold-out Barbie house based on the 1962 version
Close up of the kitchen table in a modern cardboard fold-out Barbie house based on the 1962 version

The living room:

Close up of the living room book shelf in a modern cardboard fold-out Barbie house based on the 1962 version
Close up of the living room in a modern cardboard fold-out Barbie house based on the 1962 version
Living room in a modern cardboard fold-out Barbie house based on the 1962 version

The bedroom:

Close up of the bedroom in a modern cardboard fold-out Barbie house based on the 1962 version

The patio:

Close up of the patio in a modern cardboard fold-out Barbie house based on the 1962 version

As you can see, my pink-o-meter was spiking! But in my humble opinion, in an oh-so-delightful and unapologetic way.

What do you say, Judy, Karin and Kris? You guys up for an afternoon of playing Barbies? I promise I won’t tell anyone. 😉

 Full view of the modern cardboard fold-out Barbie house based on the 1962 version
Collage of the living room, bedroom and kitchen in a modern cardboard fold-out Barbie house based on the 1962 version

Hmmmmmmmm, who knows, maybe I’ll start making refashioned Barbie clothes next. Wouldn’t that be fun!

Happy Crafting!

Beth

aka

The Renegade Seamstress

Click here for more crafting, sewing, and refashioning inspiration and tutorials.

Posted in Barbie house, Crafting, DIY, dollhouse, fabric, Photography, Sewing, Thrifting, Tutorial, upcycling | Tagged , , , , , , , , , , , , | 9 Comments

Create a Darling Dollhouse From a Vintage Suitcase

Vertical close up of a dollhouse made from a vintage suitcas

My fascination with dollhouses extended far beyond the typical age range, a secret shared only among my closest friends as we huddled together, our Barbies in hand, promising never to spill our little secret.

Well, decades later, the cat’s out of the bag!

I realize now that it wasn’t the dolls that captivated me back then, but the thrill of arranging and decorating their miniature homes.

close up of a cozy miniature loft filled with pillows in a dollhouse made in a vintage suitcase

If only I could redecorate that much in my own home. But let’s face it, constantly revamping our full-sized homes can burn quite a hole in the pocket. Enter the world of Dollhouses – a budget-friendly solution to a decorating obsession.

This Vintage Suitcase Dollhouse is the perfect blend of a passion for interior design, an affinity for thrifting, and a commitment to reusing cherished materials. It’s a creative jackpot for those who appreciate the art of upcycling.

These pint-sized homes provide the perfect canvas for creative expression, allowing an indulgence for a love for interior design without breaking the bank.

close up of a cozy miniature couch in the tiny living room of a dollhouse made from a vintage suitcase


No apologies here—get ready for the ultimate photo dump! Creating this tutorial was an absolute joy, and I couldn’t resist capturing every delightful moment through the lens. I’m unapologetically in love with every single photo, and I hope you enjoy the visual journey as much as I did!

Welcome wreath decopauged on the front of the vintage suitcase dollhouse
Tiny kitchen and loft in a dollhouse made in a vintage suitcase

Embracing a pint-sized decorating spree on a budget, let’s dive into the steps of crafting a dollhouse snugly nestled within a vintage suitcase. The magic unfolds in every meticulous detail, as we channel our younger selves in a world where playfulness reigns supreme.

So, shake off the dust from your imagination, gather your budget-friendly crafting supplies, and let’s embark on a whimsical DIY adventure. It’s not just a stroll down memory lane; it’s a journey to create timeless treasures that echo the joy of childhood.

Watch the video here:

Click here for the complete, step-by-step (and much slower) photo tutorial on how to create a Vintage Suitcase Dollhouse.

Gather your materials, starting with an old hard-sided suitcase as the foundation. Add a touch of thrifted charm or dollar store finds: a fabric placemat transforms into a cozy rug, a candle holder becomes a chic coffee table, a trinket dish serves as the perfect sink, plastic dollhouse furniture adds miniature charm, and don’t forget fabric and stuffing for pillows and mattresses. Even an old sweater can find new life as a snug blanket. It’s a creative medley of repurposed treasures!

Vintage suitcase to use for a dollhouse
some of the materials needed to decorate a dollhouse made from a vintage suitcase
close up of a miniature table made from a wooden candle lid and a branch with tiny placemats
Kitchen in a dollhouse made in a vintage suitcase complete with double sink, floating shelf, and tiny towels.
Close-up of tiny white coffee table, book and rug in a dollhouse made in a vintage suitcase.
Kitchen, living room and dining room in a dollhouse made in a vintage suitcase.
Close-up of tiny kitchen with double sink, floating shelves, glass jars and towels in a dollhouse made in a vintage suitcase.
Dollhouse made in a vintage suitcase.

I love the idea that we can we can transform everyday items into extraordinary miniature worlds.

Whether you’re an ardent lover of interior design, a thrifty shopper, or a fan of upcycling, this dollhouse made in a vintage suitcase offers an affordable and enjoyable way to express your creativity.

So, dust off that old suitcase, gather your supplies, and embark on this journey of crafting a timeless treasure. Remember, in the world of DIY, there are no limits, only endless possibilities.

Happy crafting!

Beth

aka

The Renegade Seamstress

Click here for more crafting, sewing, and refashioning inspiration and tutorials.

Posted in Crafting, DIY, fabric, Photography, recycling, Sewing, Thrifting, Tutorial, upcycling, video | Tagged , , , , , , , , , , | 8 Comments

DIY Fabric Lip Balm Holder

A few months back, I was lucky enough to be jetting off to the sunny shores of Mexico with a few friends. As we were meandering through the airport, we stumbled upon these nifty little fabric lip balm holders – and they were clip-on! It was love at first sight. And me being me, my first thought was, I could make one of those.

I came right home, and to my delight, discovered that making these little wonders is a breeze. All you need are a few scraps of fabric, and you can craft your very own. Just imagine the convenience – no more frantic searches through your bag for the elusive chapstick.

Here we go!

Close up of a DIY fabric lip balm holder clipped to the outside of a purse

Click here for the complete (and much slower) step-by-step, photo tutorial.

close up of a DIY fabric lip balm holder next to a tube of chapstick
close up of a DIY fabric lip balm holder clipped to keys
close up of a DIY fabric lip balm holder clipped to the outside of a purse

And there you have it!

Say goodbye to emptying your entire bag in search of a tiny tube of lip balm and hello to smooth, moisturized lips without the stress. (Marie Kondo and Heidi Klum will be so proud of you.)

Happy Sewing!

Beth

aka The Renegade Seamstress

For more sewing, refashioning, and crafting inspiration and tutorials, click here.

Posted in Crafting, DIY, fabric, gifts, Sewing, Tutorial, video | Tagged , , , , , , , , | 4 Comments

How to Make a Snug-as-a-Bug-in-a-Rug Mug Cozy From an Old Sweater

Cup and Mug Cozy made from and old sweater filled with tea by a fireplace

Ever come in from a thrilling day of carving up the slopes or a laughter-filled sled race with your kiddos, cheeks rosy and heart pumping, only to be greeted by the frosty bite of winter’s chill? Brrr! ❄️

We’ve all been there, right?

And what’s the ultimate cure for that icy sting?

Why, wrapping your mitts around a steaming mug of your favorite hot beverage, of course!  Whether you’re a tea devotee, a coffee connoisseur, or a hot chocolate aficionado, there’s nothing quite like the comforting warmth of a well-loved mug to chase away the cold.

But wait…what if we could kick that coziness factor up a notch? Yes, my friends, I’m talking about transforming old sweater scraps into a snug-as-a-bug-in-a-rug mug cozy. It’s like a warm hug for your cuppa!

So, grab your crafting kit, pull up a chair by the fire, and let’s dive into this DIY adventure together.

Ready to stitch some magic? Let’s get to it!

Materials needed to make a mug cozy from an old sweater

Click here for the complete (and much slower) step-by-step instructions for the Mug Cozy.

close up of a mug cozy by a fireplace

Now, no matter if you’re warming up after an epic snowball fight, savoring a quiet moment by the fireplace, or binge-watching your favorite series (anyone else Team “Great British Sewing Bee”?), your trusty mug will be by your side, looking fabulous and keeping your drink toasty warm.

So, here’s to cozy crafting, hot beverages, and making everyday moments a little bit more special.

Happy Sewing!

Beth

aka

The Renegade Seamstress

For more sewing, crafting, and refashioning tutorials and inspiration, click here.

Posted in Crafting, DIY, Reconstructed clothing, recycling, Refashion, Refashioning, Sewing, Thrifting, Tutorial, upcycling | Tagged , , , , , , , , | 6 Comments