
Last summer I posted a popular DIY Summer Totebag with a link to the tutorial I used. WHAT IS THAT YOU SAY!!!???!
That tutorial is no longer available!!??!
Dang!
Well, have no fear, The Renegade Seamstress is here. 🙂
I just made one for you.

First, you’ll need to choose three fabrics. One for the lining, another for the main body of the bag and a contrasting fabric for the bottom and the straps. This fun IKEA fabric was begging to be made into a bag.
And perfect for a birthday present for my awesome friend, Carol, who celebrated her birthday yesterday.
Happy birthday, Sistah!!!!

You will need:
- 1 yard fabric for exterior of tote
- 1 yard fabric for interior of tote
- 1/3 yard for contrast bottom (more if you are going to make your own straps)
- 1 yard heavy fusible interfacing
- 2 1/2 yards of 1 1/4″ heavy cotton webbing (you won’t need this if you make your own straps)
Cut list:
Exterior Fabric:
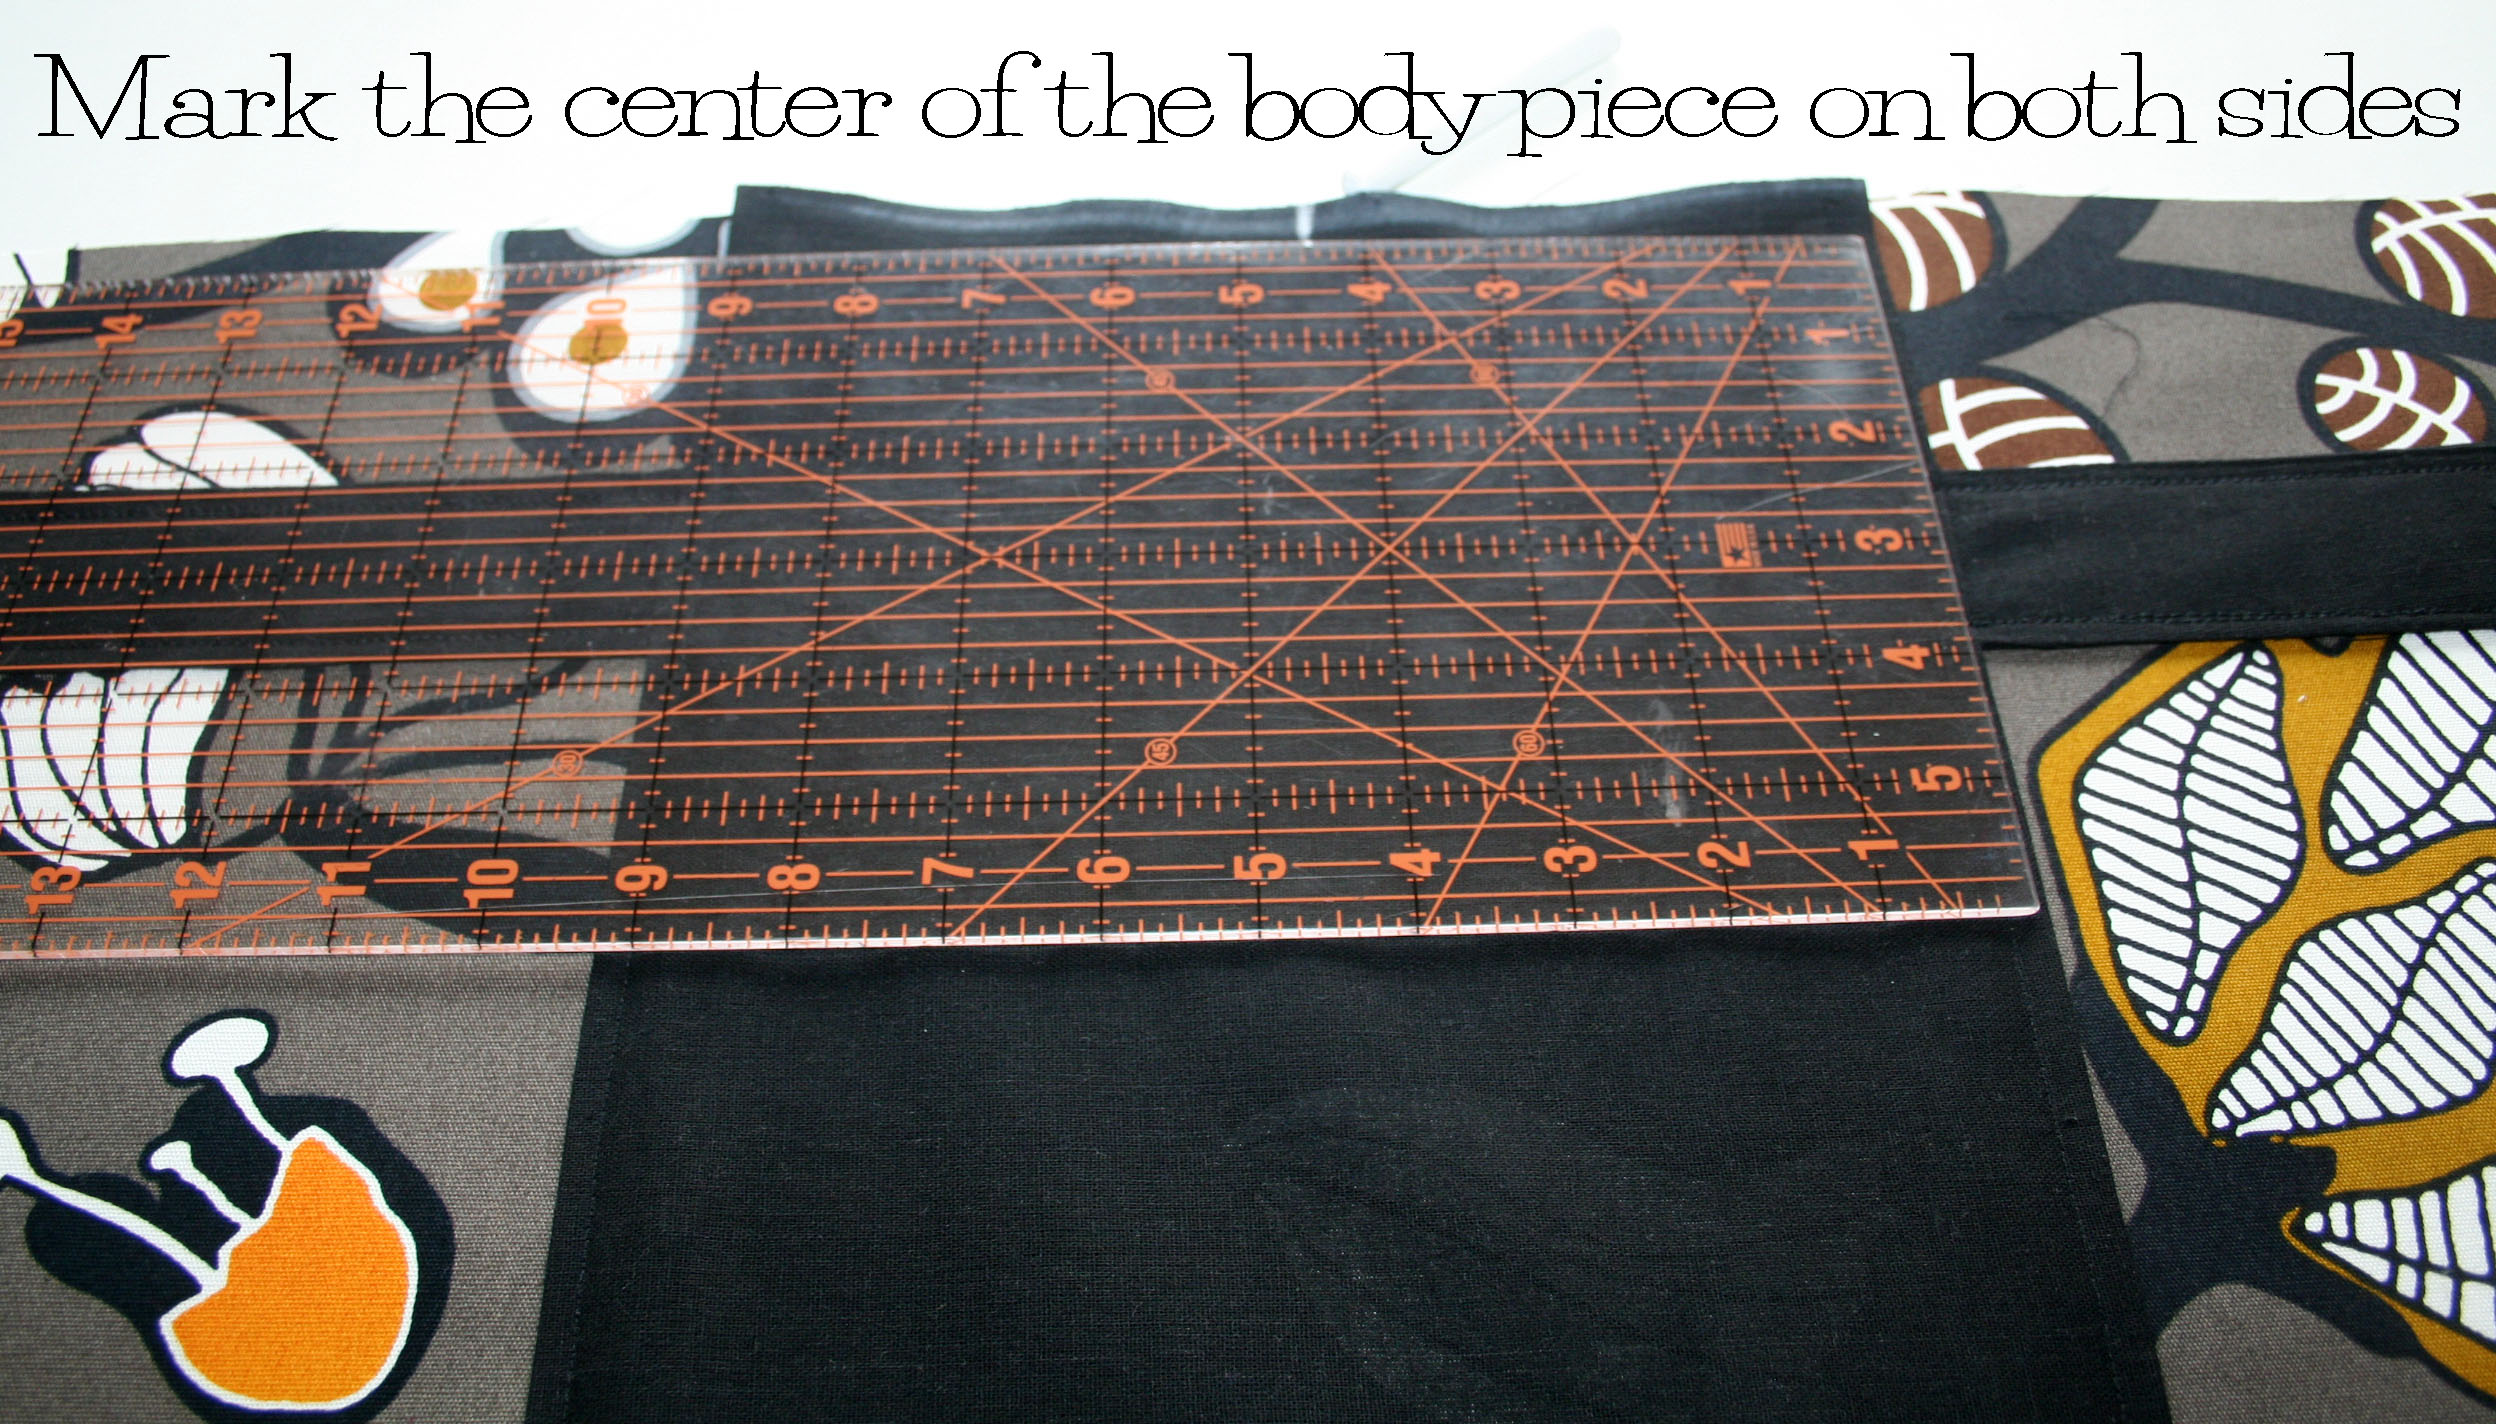
- Body- Cut one piece 15″ wide x 25 1/2″ long
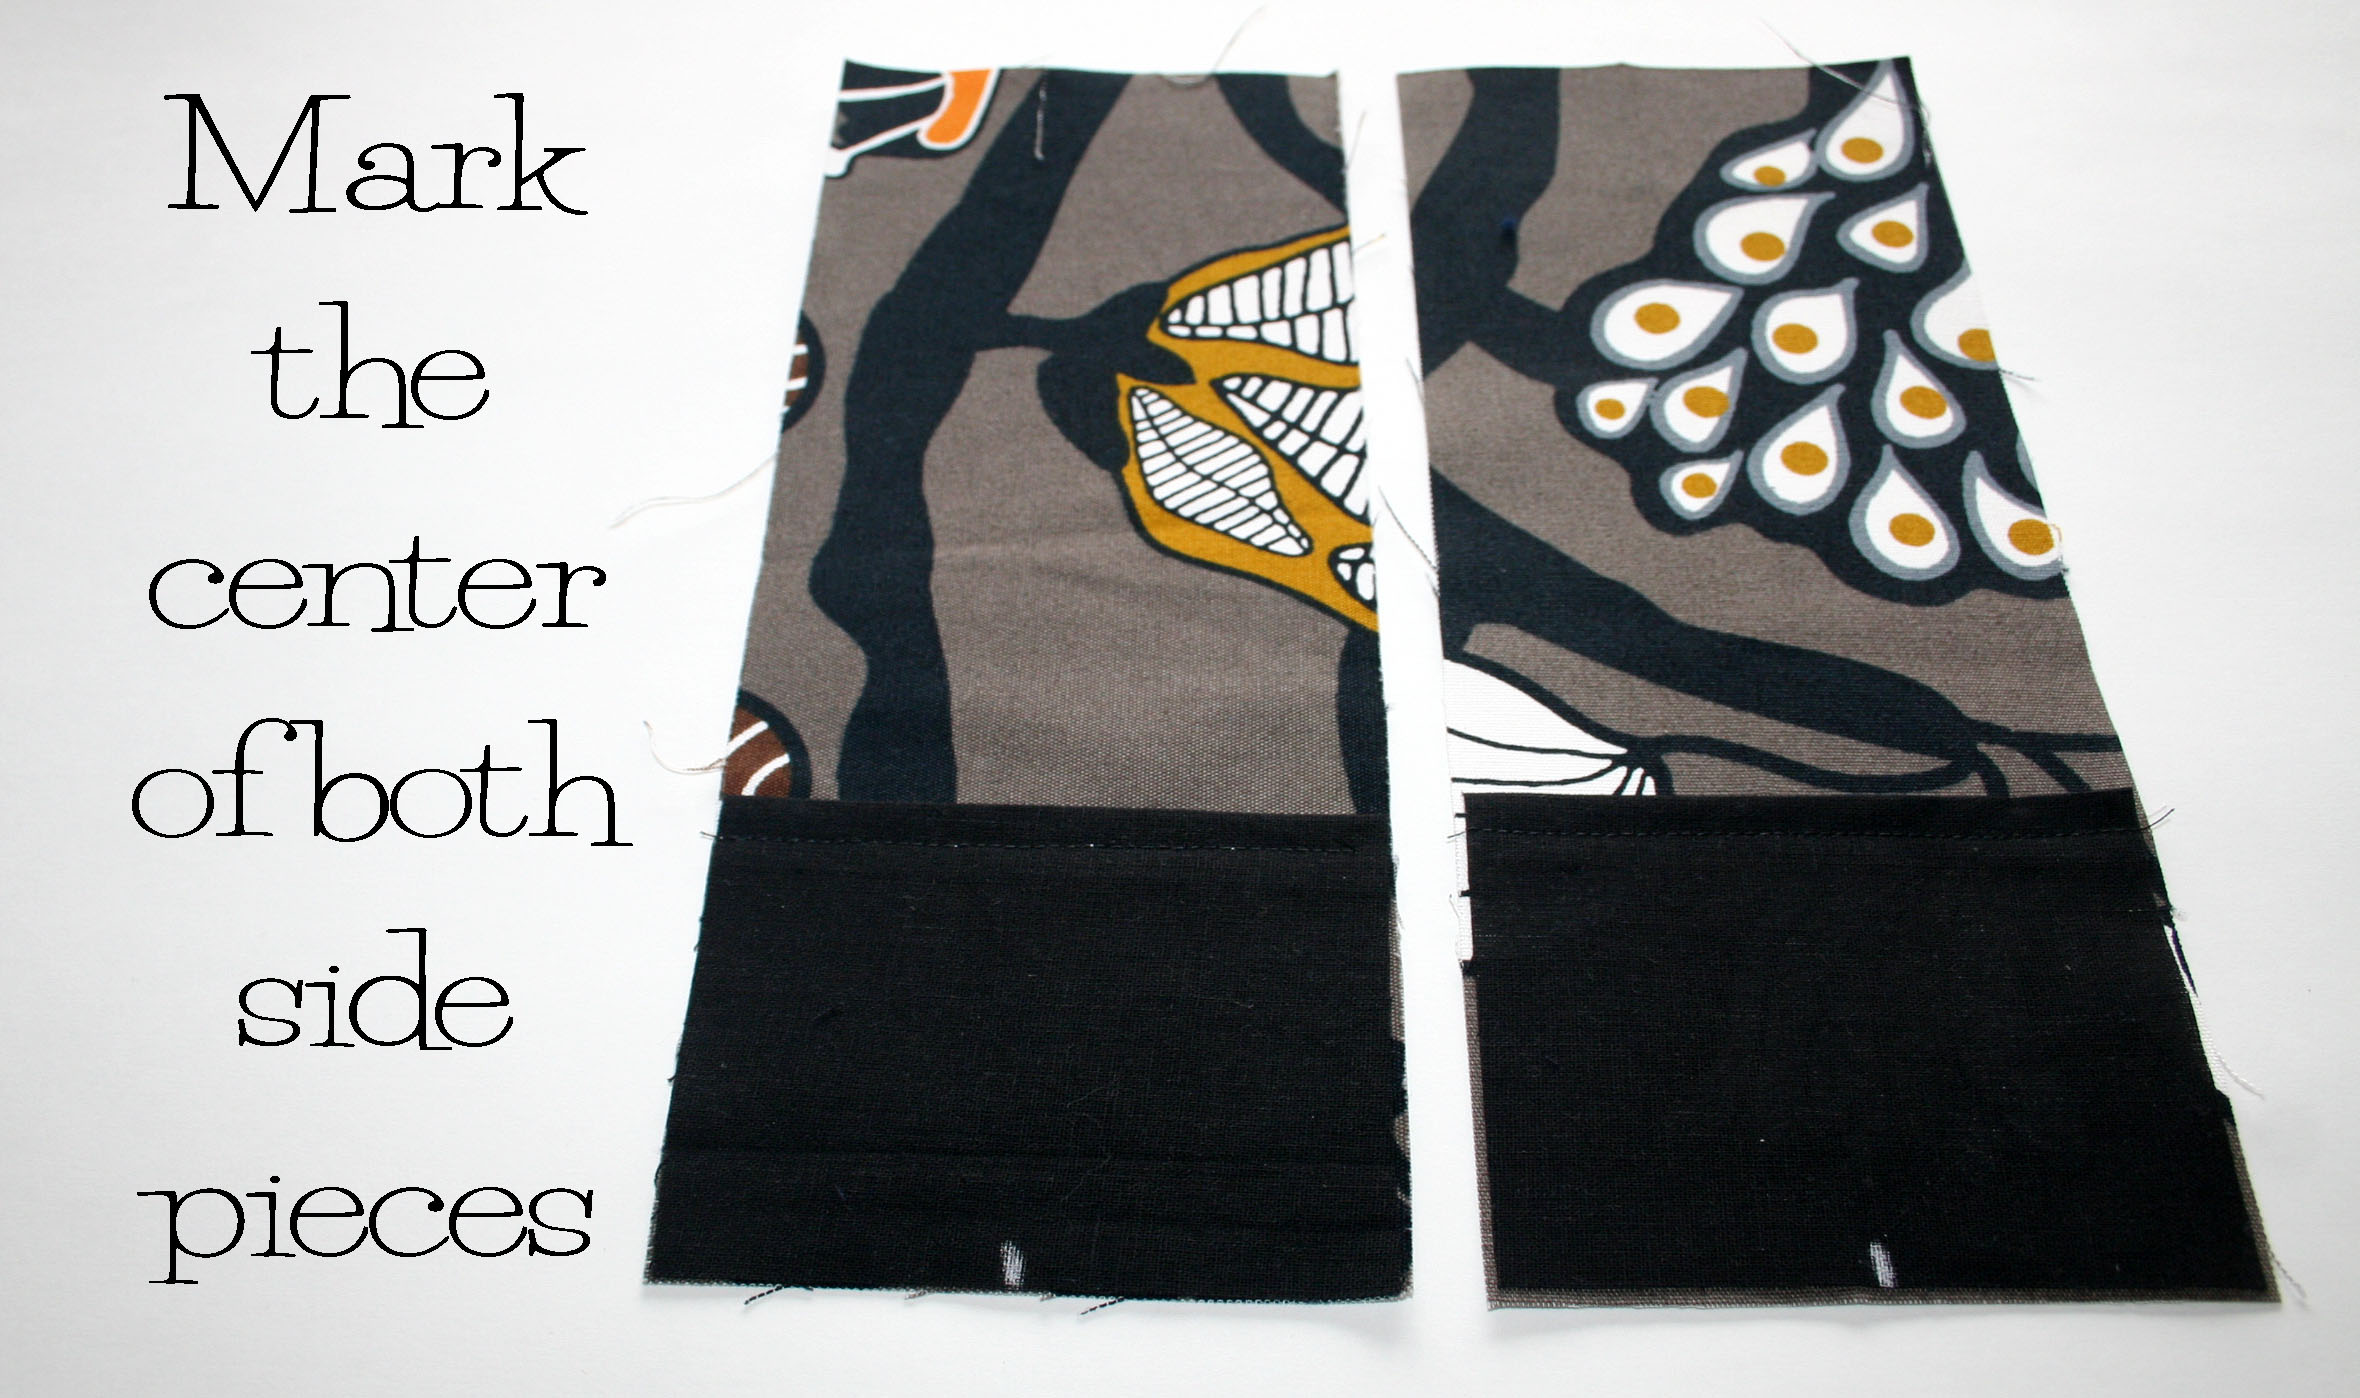
- Sides- Cut two pieces 4 1/2″ wide x 11 1/2″ long
- Pocket- Cut one piece 8 1/2″ wide x 7″ long
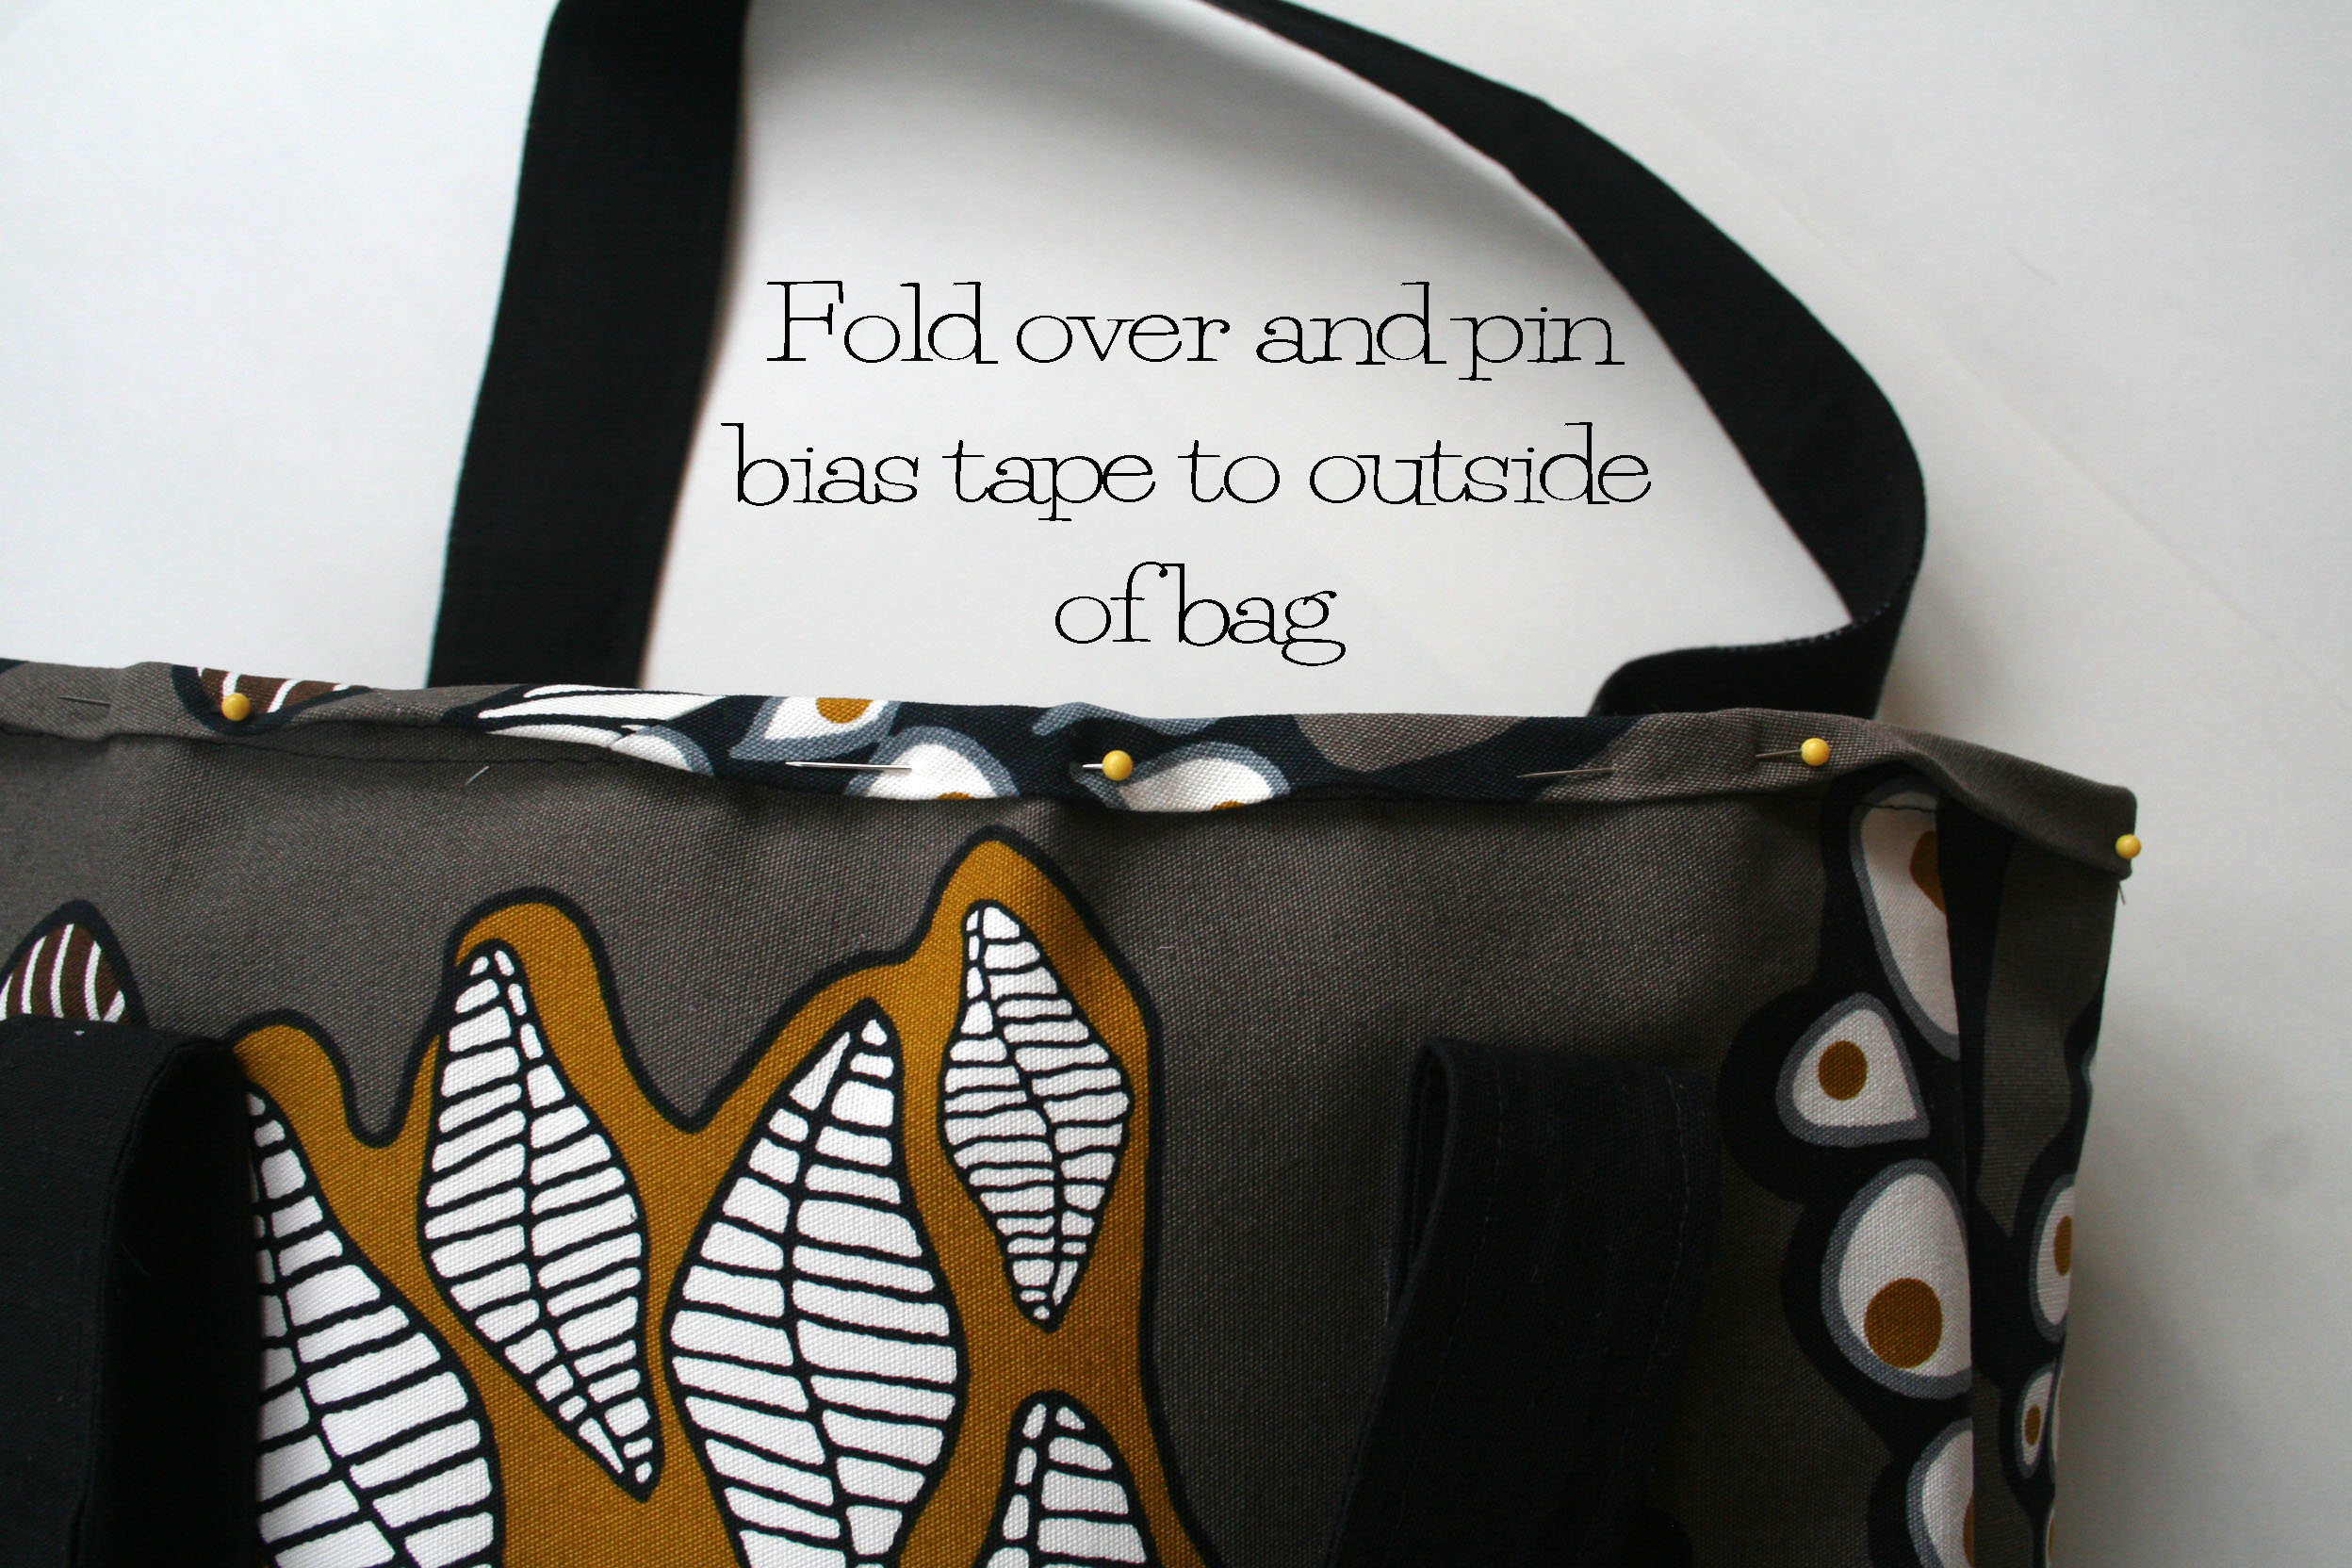
- Bias tape- Cut a piece 2″ wide x 37″ long (Check out this tutorial: The Beauty of Bias Tape: Make Your Own)
Contrast Fabric:
- Body- Cut one piece 15″ wide x 10 1/2″ long
- Sides- Cut two pieces 4 1/2″ wide x 4″ long
- Straps- If you decide to make you own instead of using webbing, you’ll need four pieces 2 1/2″ wide x 38″ long
Lining Fabric:
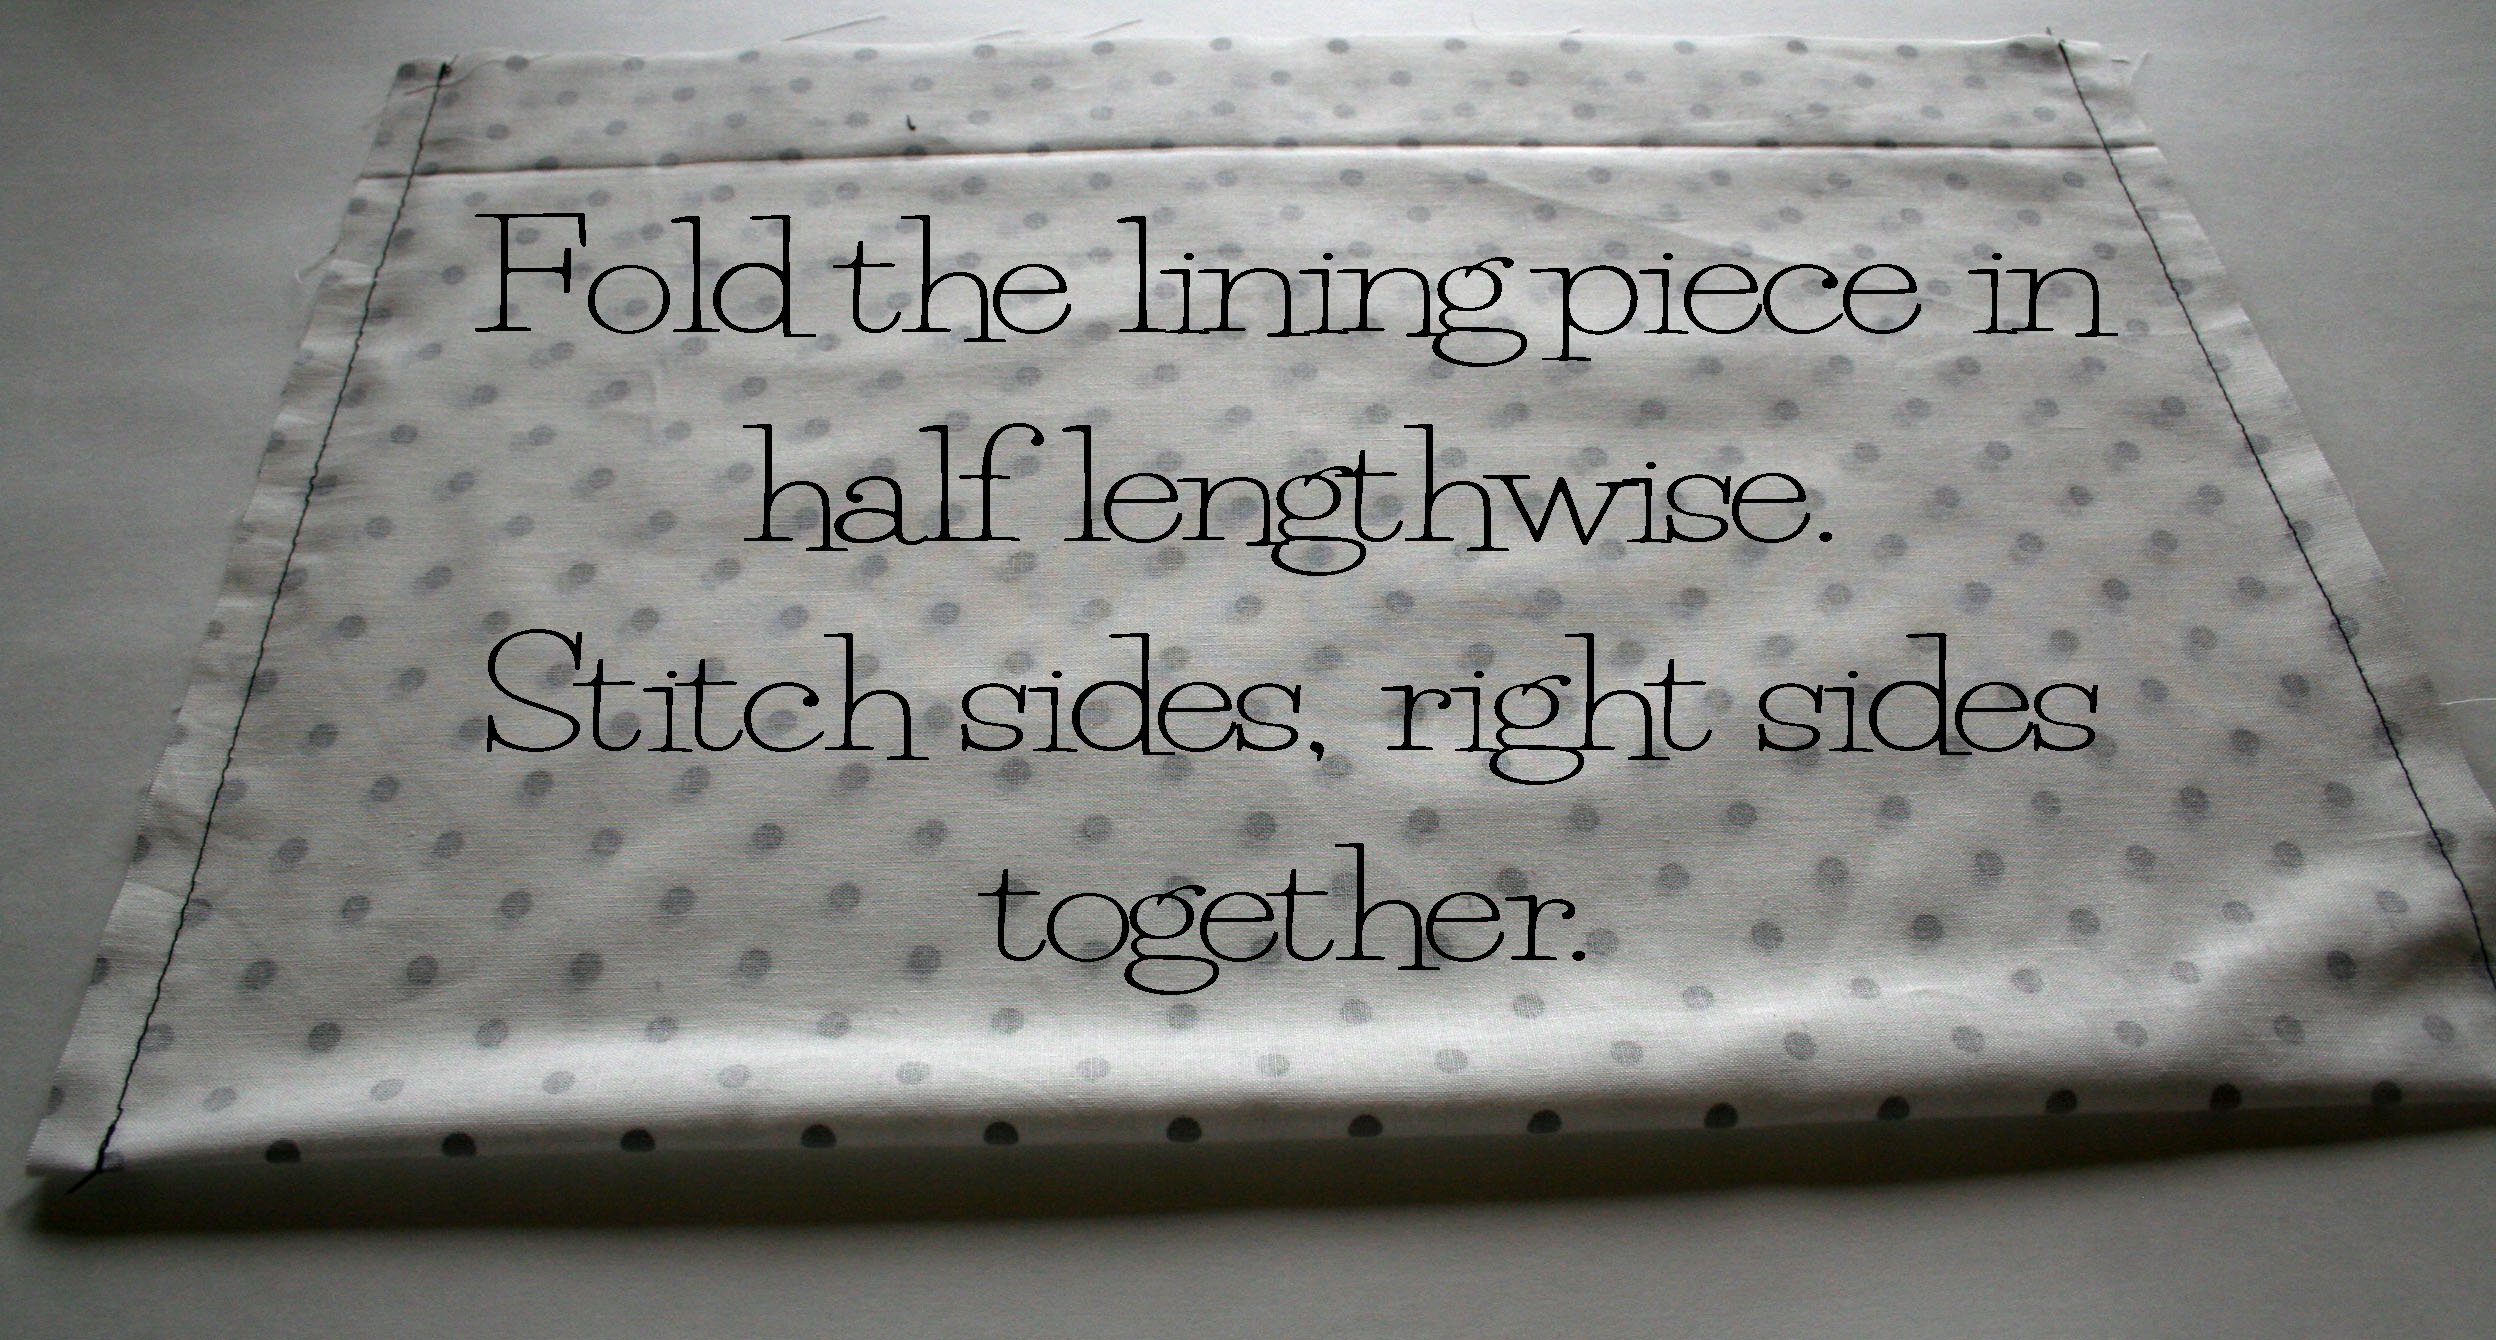
- Body- Cut one piece 18 1/2″ wide x 25″ long
Interfacing:
- Body- Cut one piece 14 1/2″ wide x 25″ long
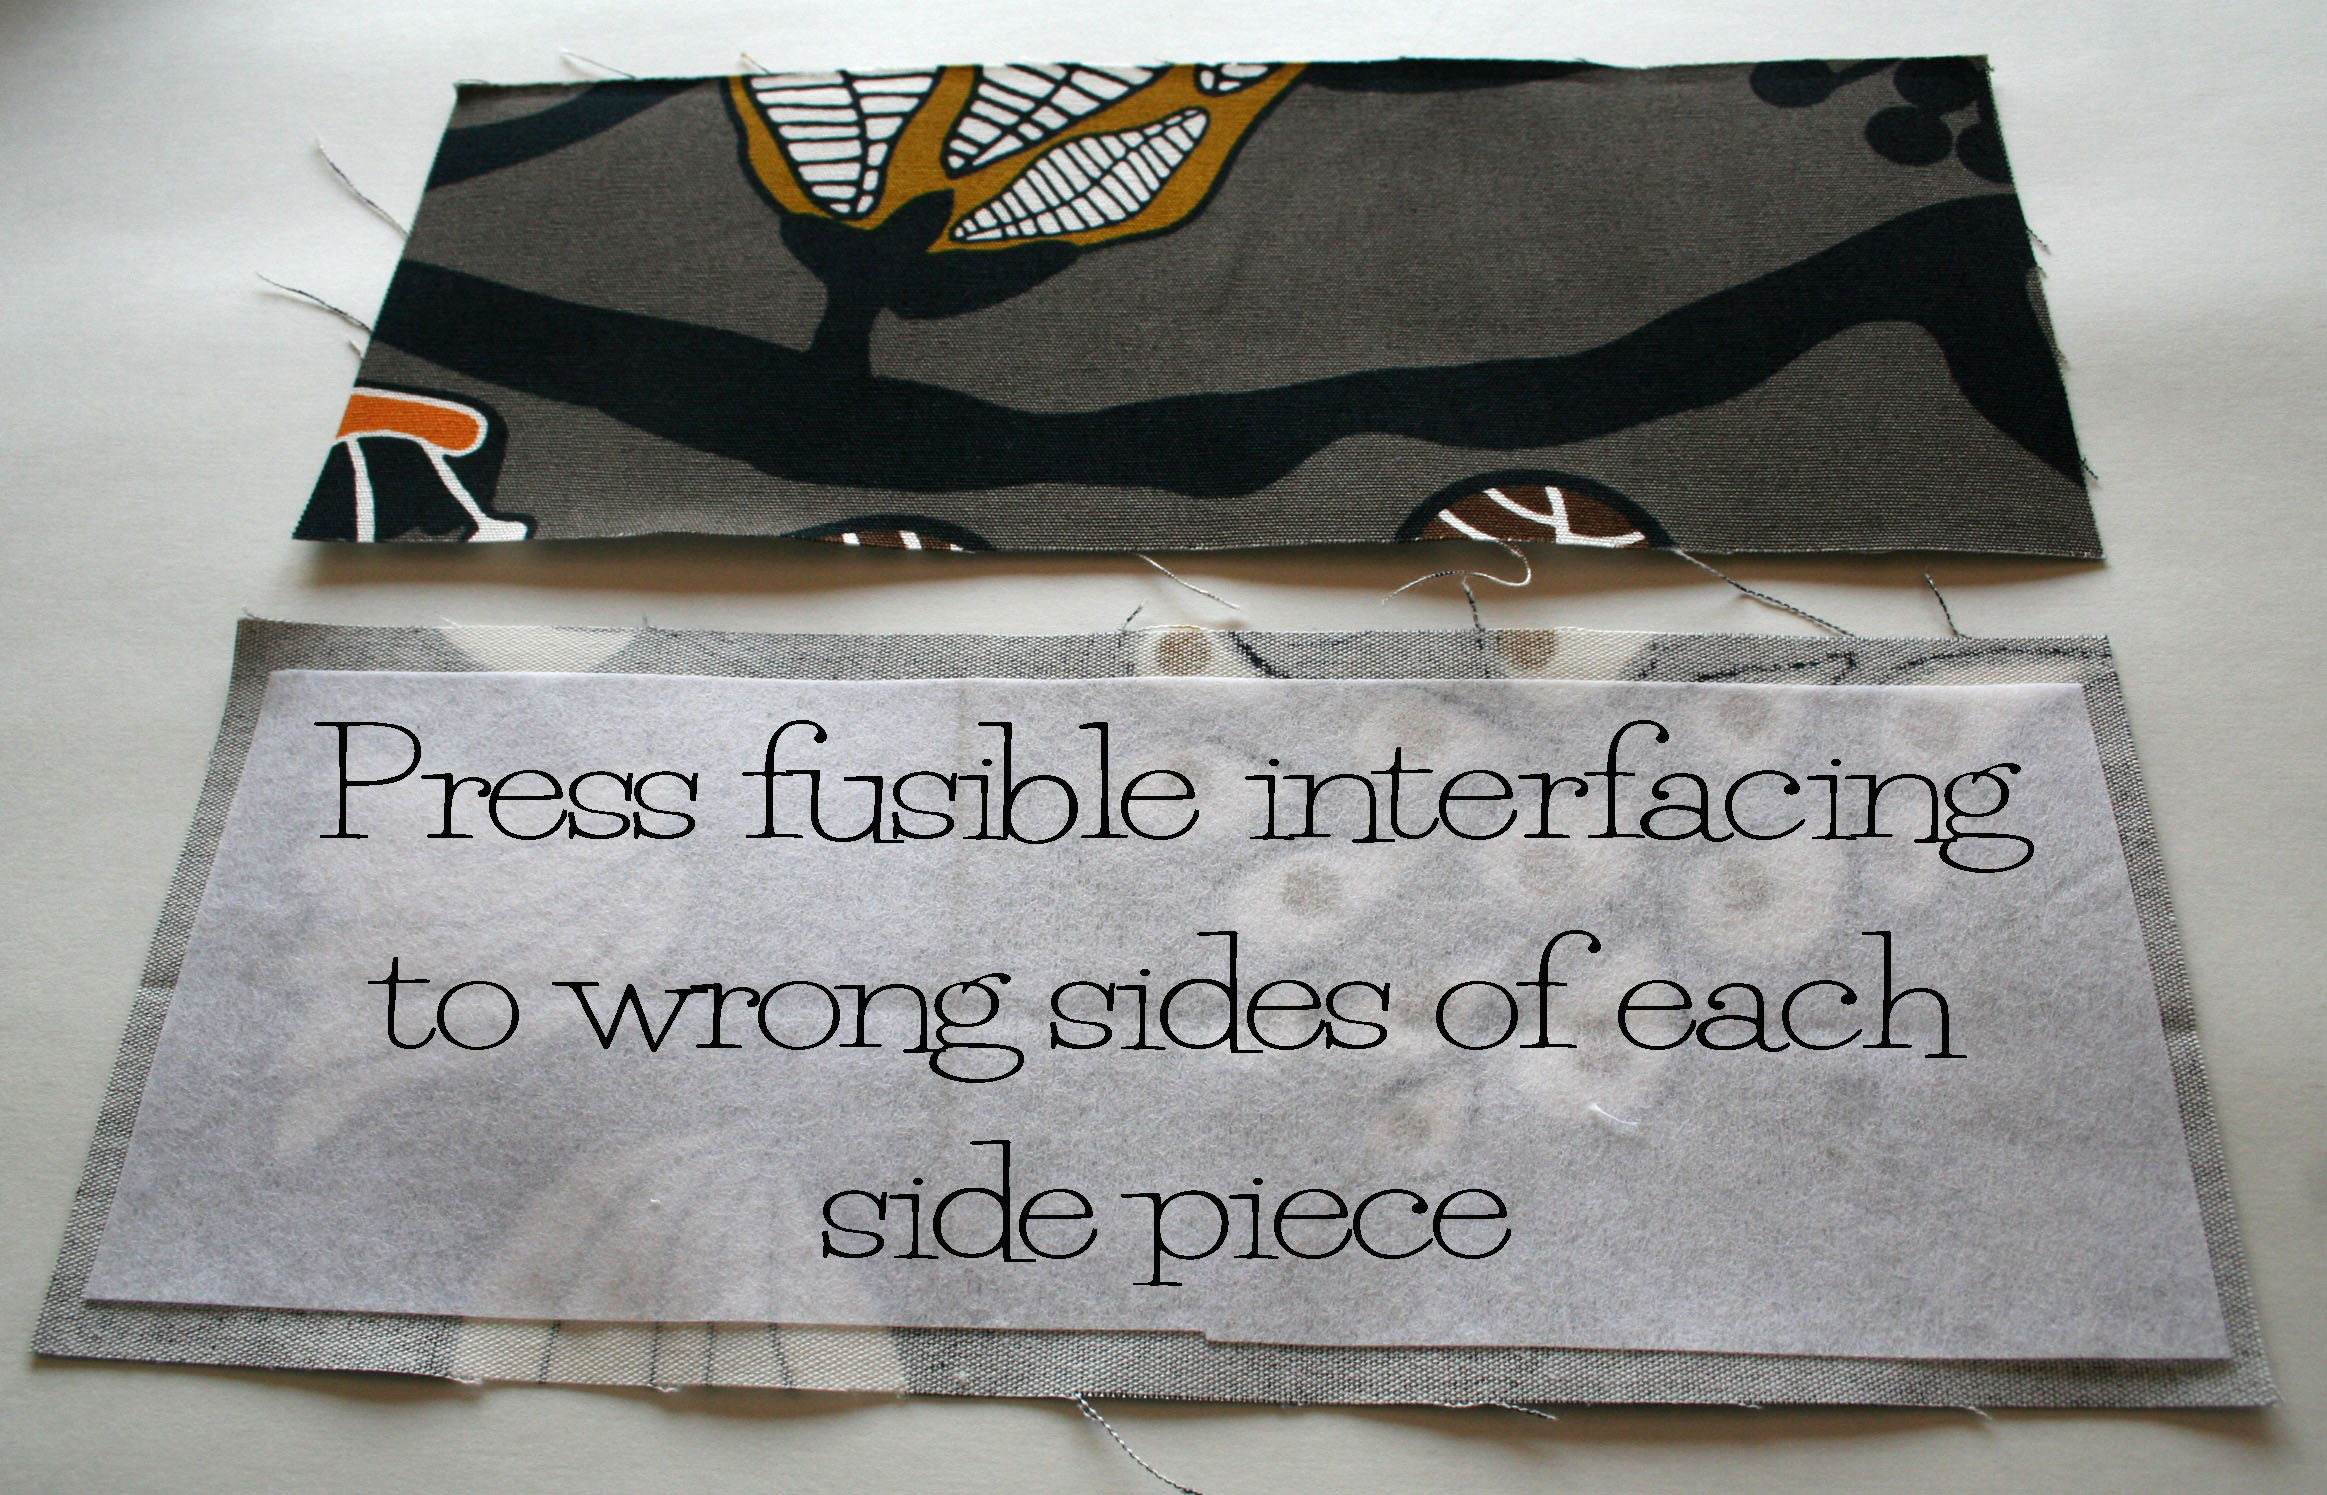
- Sides- Cut two pieces 4″ wide x 11″ long
- Pocket- Cut one piece 8 1/2″ wide by 5 1/2″ long
- If you are making your own straps cut two pieces 1 1/4″ wide x 38″ long
Here’s how:

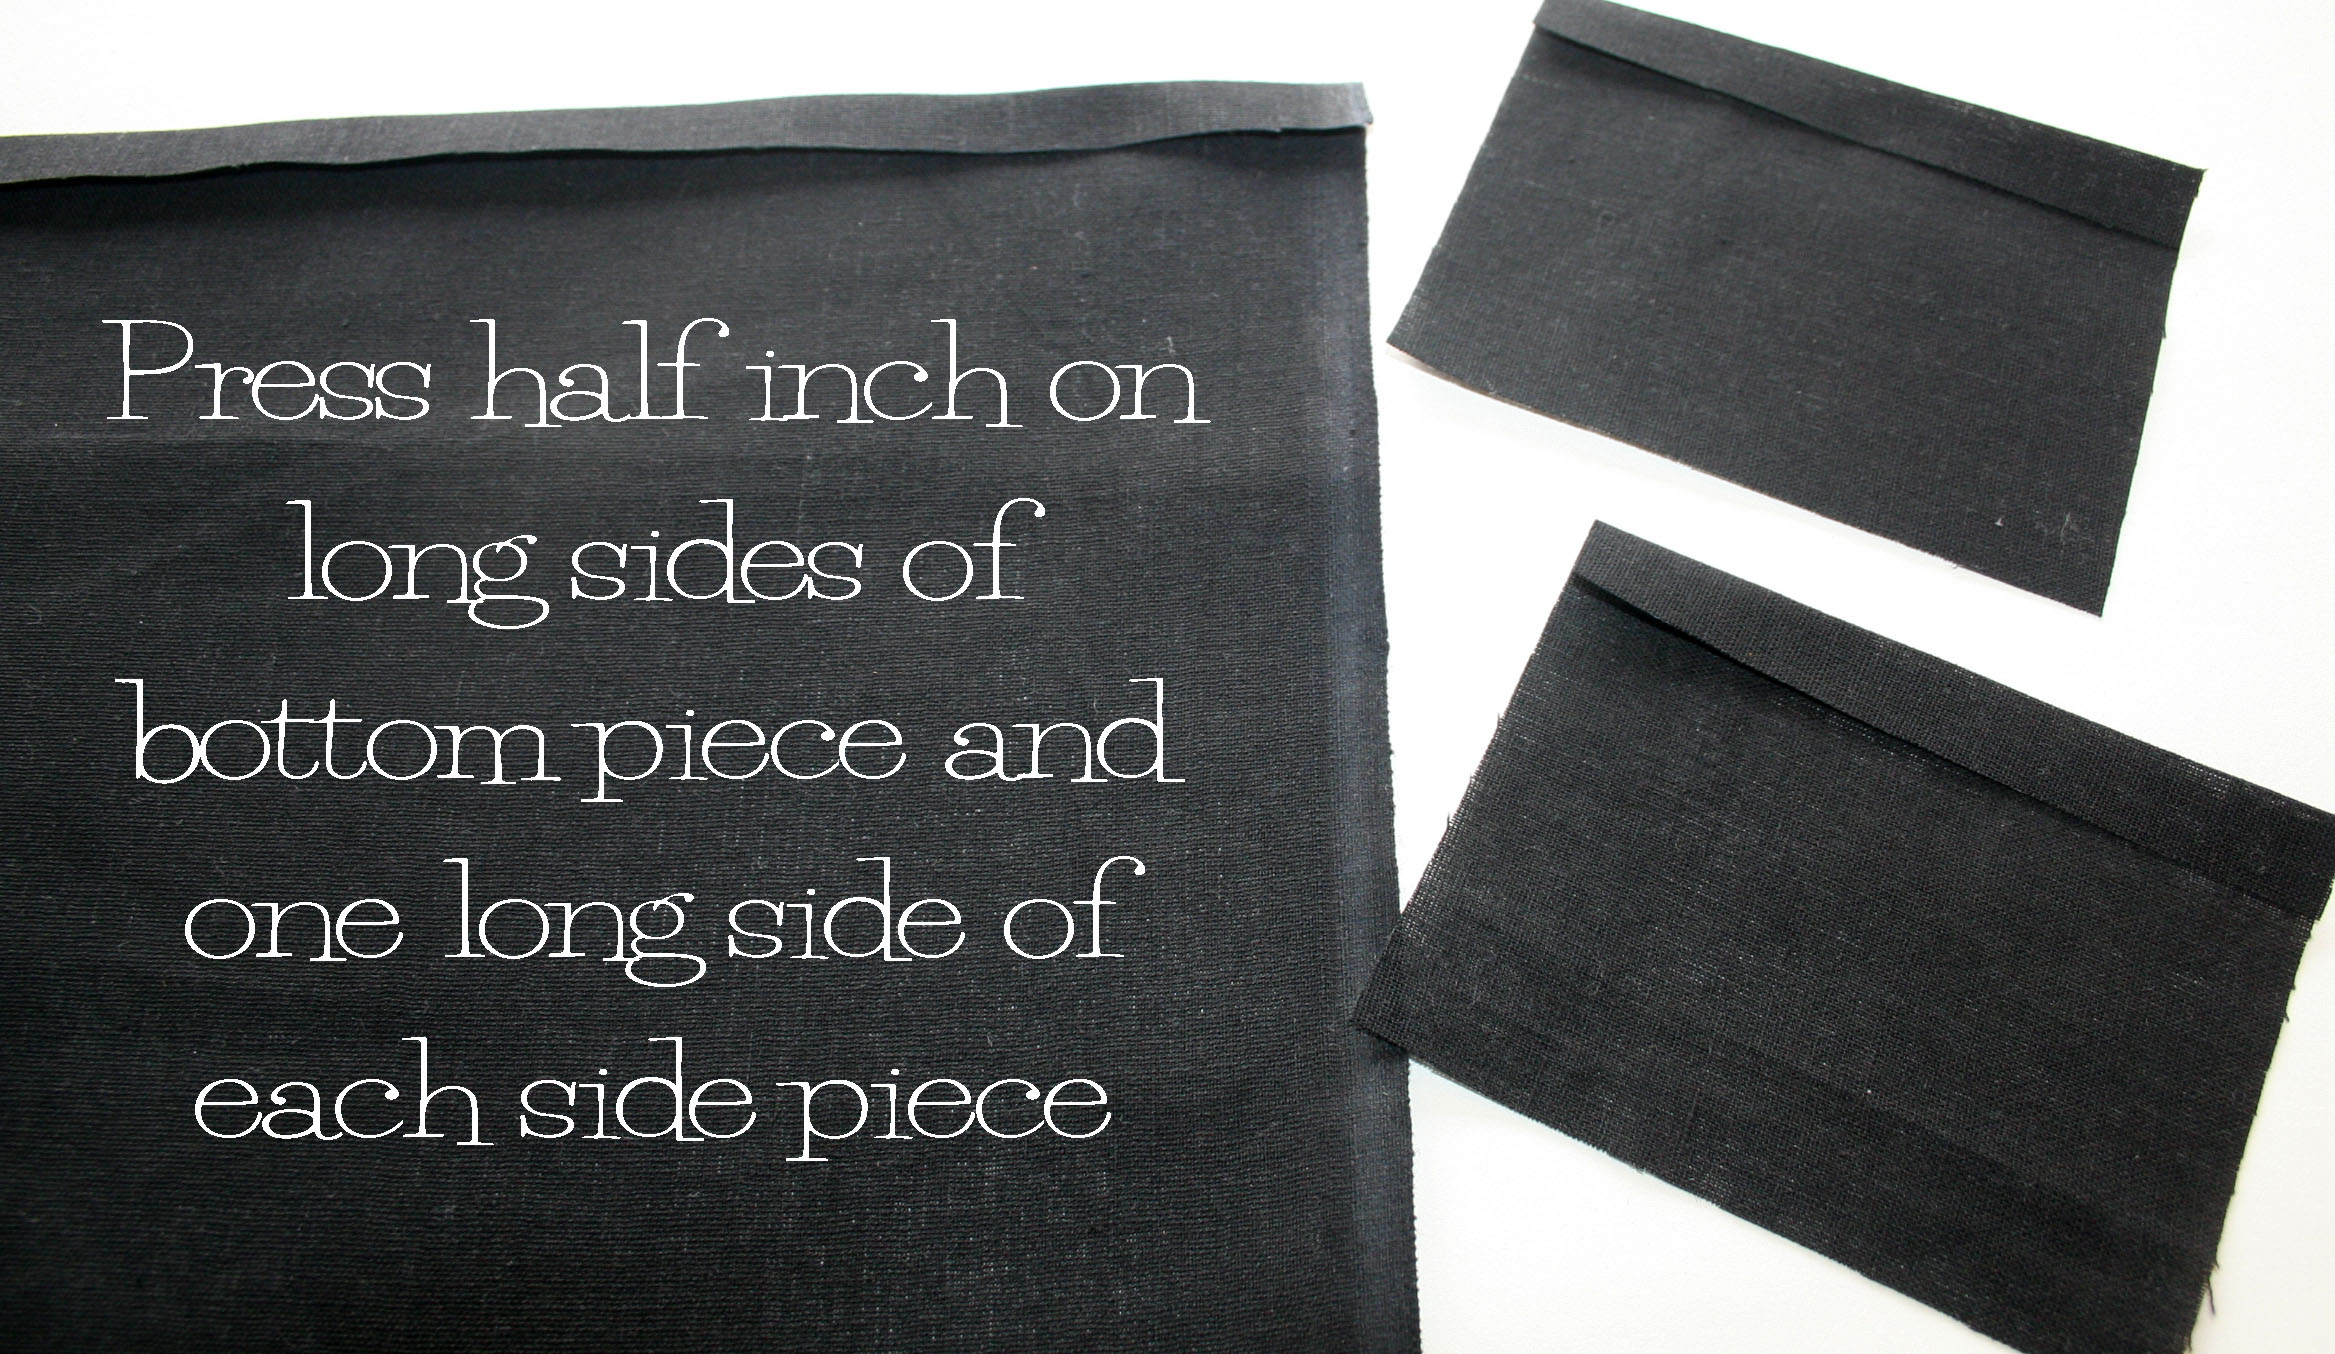


Here’s where you can make your own coordinating straps or use webbing. If you’re making your own, first iron the interfacing on one strap piece. Then, right sides together, sew the two long sides. Turn strap right side out and topstitch the edges. Do this for both straps. Now on to the rest of the bag.


You might also like:

If you haven’t had a chance to check out Sheyanne’s Senior Project, click on her beautiful picture and find out what all the fuss is about:

I hope you will sign up.


THANK YOU! for such a clear tutorial. As a beginner, I need all the help I can get, and as a visual learner, this is PERFECT! Your tote bag looks awesome. I love the colours. Wonder if I can sneak off to IKEA today….. Hmmm.
Oh, you are so lucky, Nancy, that you have an IKEA close by. I’m glad this will be helpful to you, if you make one, send me a photo, I’d love to see it.
Happy Sewing!
Beth
I love the IKEA fabric!! And I love this bag style. I’m going to bookmark this one. Thanks!
Thank you, Steph! I hope you’ll make one and send me photos!!!!
Pingback: DIY Summer Totebag | The Renegade Seamstress
I love the material you used~ Date: Sat, 23 Feb 2013 14:56:09 +0000 To: cadiacetis@hotmail.com
Thanks, Cathy!! Do you still want to go to Heather and Buster’s house with me this afternoon?
I just love it! And thank you so much for the excellent tutorial, Beth! 🙂
Thanks! I’ve made so many of these, I could practically make one in my sleep. My friends have dubbed them “Beth Bags”.
Adorable. You fabric choices are perfect and the tutorial is awesome.
Thank you, Jill! I just love this Ikea fabric, too. I debated whether to make a pencil skirt or a tote from it. I think I still have enough for a skirt. Hmmmmm…….maybe……
I love this too. I love tote bags. Does IKEA sell fabric?? I’ve missed that?? We need to do a Portland, beach and craft run this summer. would be so fun to go resell shopping, garage saling and r and r -ing while on a treasure hunt.
OMGosh, Barb, I would LOVE that!! It would be fun to go “sailing” with you and check out some new territory. I’m in FOR SURE! And, yes, Ikea has fabric. You have to buy it in the store, though. They don’t sell it on line. Boo :(. But, on the bright side, we have to do a trip to see it!
Love and emailed to my girlfriend who loves to make totes. Thanks!
Paula
Oh, good. Thanks! I hope she can use it. Does she have a blog or website?
She doesn’t 😦
Oh darn, I was going to check out her bags…..
I always use mine and think of you Beth! Great fabric….
Love you, Mari!!!
Well done on the bag and tutorial. This is really a usefull proect, can’t wait to get the time to do it.
Thank you!!!
A nice clear tutorial! Thank you! You used my favourite IKEA fabric! I have a pencil skirt in it!
SERIOUSLY????!! I was thinking of making a pencil skirt, too! Great minds think alike. 🙂
It’s one if my favourite skirts! See http://www.flickr.com/photos/31076676@N08/5987599160/in/set-72157625266535241
Go for it!
Oh I love it!!! I was going to make it before I decided to make the Vera skirt. But now that I’ve seen your skirt, I’m going to have to make one!
It’s one of my favourite skirts! See http://www.flickr.com/photos/31076676@N08/5987599160/in/set-72157625266535241
Go for it!
Thanks for this great little project I have just the fabric!
Ohhhh, I can’t wait to see your tote!
Thanks for the tute….i pinned it to make later. I had to move all the way to Singapore to live near an Ikea! I am gonna check out their fabric! I have only found one fabric store since I’ve been here so far. Love your blog!
The closest IKEA to me is four hours away. Needless to say, I don’t get to go very often.
I love the tote. The colors are very stylish.
Thank you, Miss Mary!
This is a beautiful tote – when I saw it I laughed so hard the dogs and my husband came running. When he asked why, I asked if he remembered the post I had made today to post tomorrow about the tote I made. He responded that yes, he remembered it – then I showed him yours……….and HE started laughing! Yeah, it looks JUST LIKE yours………….only the opposite of that. 🙂
Really, the birthday girl is very lucky!!!
You made one, too!!??! Great minds think alike!!! 🙂
Thanks for the tutorial. I have pinned to work on it later. It’s so great to actually see how it’s made. Once the basics are understood one can make this in a different size, from whatever fabrics one has handy.
Thanks again!
Oh yes, the possibilities are endless!!!!
Beth, you know you are taking me there with this black and white fabric with a pop of color! This is one reason EVERYONE EVERYWHERE should love black and white. You get to see really talented people make really cute stuff out of it. Lol! Great job.
Thanks! Gotta love black and white!!!
very clear, beautiful fabric, excellent pictures.
great job! thank you for this tutorial!
Thank YOU, Jaya!
You’re reminding me how much I love IKEA’s super cheap and stylin’ fabrics. I always buy too much though because my IKEA is far away. Probably that’s a good thing. I like the bias at the top — good detail.
I know what you mean about buying too much. I live so far away from one, too and I’ve got the same problem. At 7 bucks a yard for heavy fabric, it’s hard to resist.
I know! I’m still making stuff from the green and blue tree fabric I bought like five years ago or something.
I’ve been toying with the idea of going on a fabric fast for a year and just forcing myself to use up what I already have. Sometimes the most creative projects come from something like this.
Cool tut beth!!! thanks for sharing!
Thanks so much!!!
You are just too clever. I think I know what I will do with some IKEA cloth napkins I have now…..
Oh, yes, I love the IKEA designs!!!
Hello Ms. Renegade! (love that) I am always impressed with your clothing make-overs, so thank you for sharing them with us all. How long did this take you to complete? I’m working on a project to create lots of totebags and looking for a quick and easy solution. The project is for homeless teens enrolled in the Fort Worth ISD. I’ve learned that for the homeless, something to carry their things in is a necessitiy that those of us with homes don’t realize the importance of Do you have any recommendations or links for quick and easy tote bags? One thought was to make them out of donated T-shirts. I’m working with several people to make them and having a print out of simple directions would be helpful. Any suggestion you may offer would be much appreciated. Thanks!
Hi Lialou!
Thank you for the encouragement. I love what you’re doing with the bags, what a great idea!
This bag takes about an hour and a half to make with cutting out the fabric pieces and putting it all together with the lining. Here’s a couple of links to tutorials, although I haven’t made any of these, but they look quick and easy.
http://ocd-obsessivecraftingdisorder.blogspot.com/2011/09/bag-lady-week-simple-tote-tutorial-and.html
http://sewmamasew.com/blog2/2008/07/classic-tote-tutorial/
Thank you! the second link looks like it would be quicker, I’m going to get the group together and see what we can get done. Thanks again!
Let me know how it goes.
What a beautiful tote – so professional looking, and lovely fabric. I was happy to get the link to the bias tape tutorial as well. Question: In looking at your photo where the bias tape is pinned to the inside of the bag, it appears that there is no center press line on the bias tape – is this correct? If so, did you make it this way so that the bias tape will be rounded rather than having a crease line? Thanks for your help.
No, there is a crease, I pressed it, but when I opened it up, since it was such thick fabric it didn’t show in the photo.
Thanks, as always for the nice comments!!
Beth
Oh, good to know! Thanks!
You are so welcome! Anytime!
Thank you so much for this tutorial – I loved the original tote when I found it on pinterest and was disappointed when it wasn’t available any longer. Now I think I need to go hunting for some nice fabric!
You are so welcome, Sarah Jane. Have fun!
Beth
Great looking tote bag. You have inspired me to use a piece of 1960’s vintage canvas dot fabric I rescued from my Mom’s stash! I have everything cut out but have a question about the dimensions of the interfacing for the side pieces. In the cut list, they are about half the total length but in the tutorial, appear to be the full length. Am I missing something? I can’t wait to get sewing and will share a photo of the finished product.
Christine
Oh my gosh, Christine. Thanks for pointing that out. The side interfacing pieces should be 11 inches long. I changed it on the tutorial. I can’t wait to see pictures of your tote. Hope you have as much fun making them as I do.
Beth
I am so happy with the finished product and received many compliments! I had enough left over to make a small “Open wide zippered pouch” from Noodle-head.com. Will share photos of both projects. Thank you again.
Hi Christine, I got the photos and your bag is adorable. I’d like to post them on the blog if that’s OK with you. Let me know…
Beth
Thank you so much for the tutorial!
I just did my first bag and I know I’ll do tons of them! It looks fantastic!
Hi Lis,
I’m so glad the tutorial worked out for you! Aren’t these so much fun to make!!!! I’d love to see the bag you made. Here’s my email address if you’d like to send me a picture:
bhunting@eoni.com
Beth
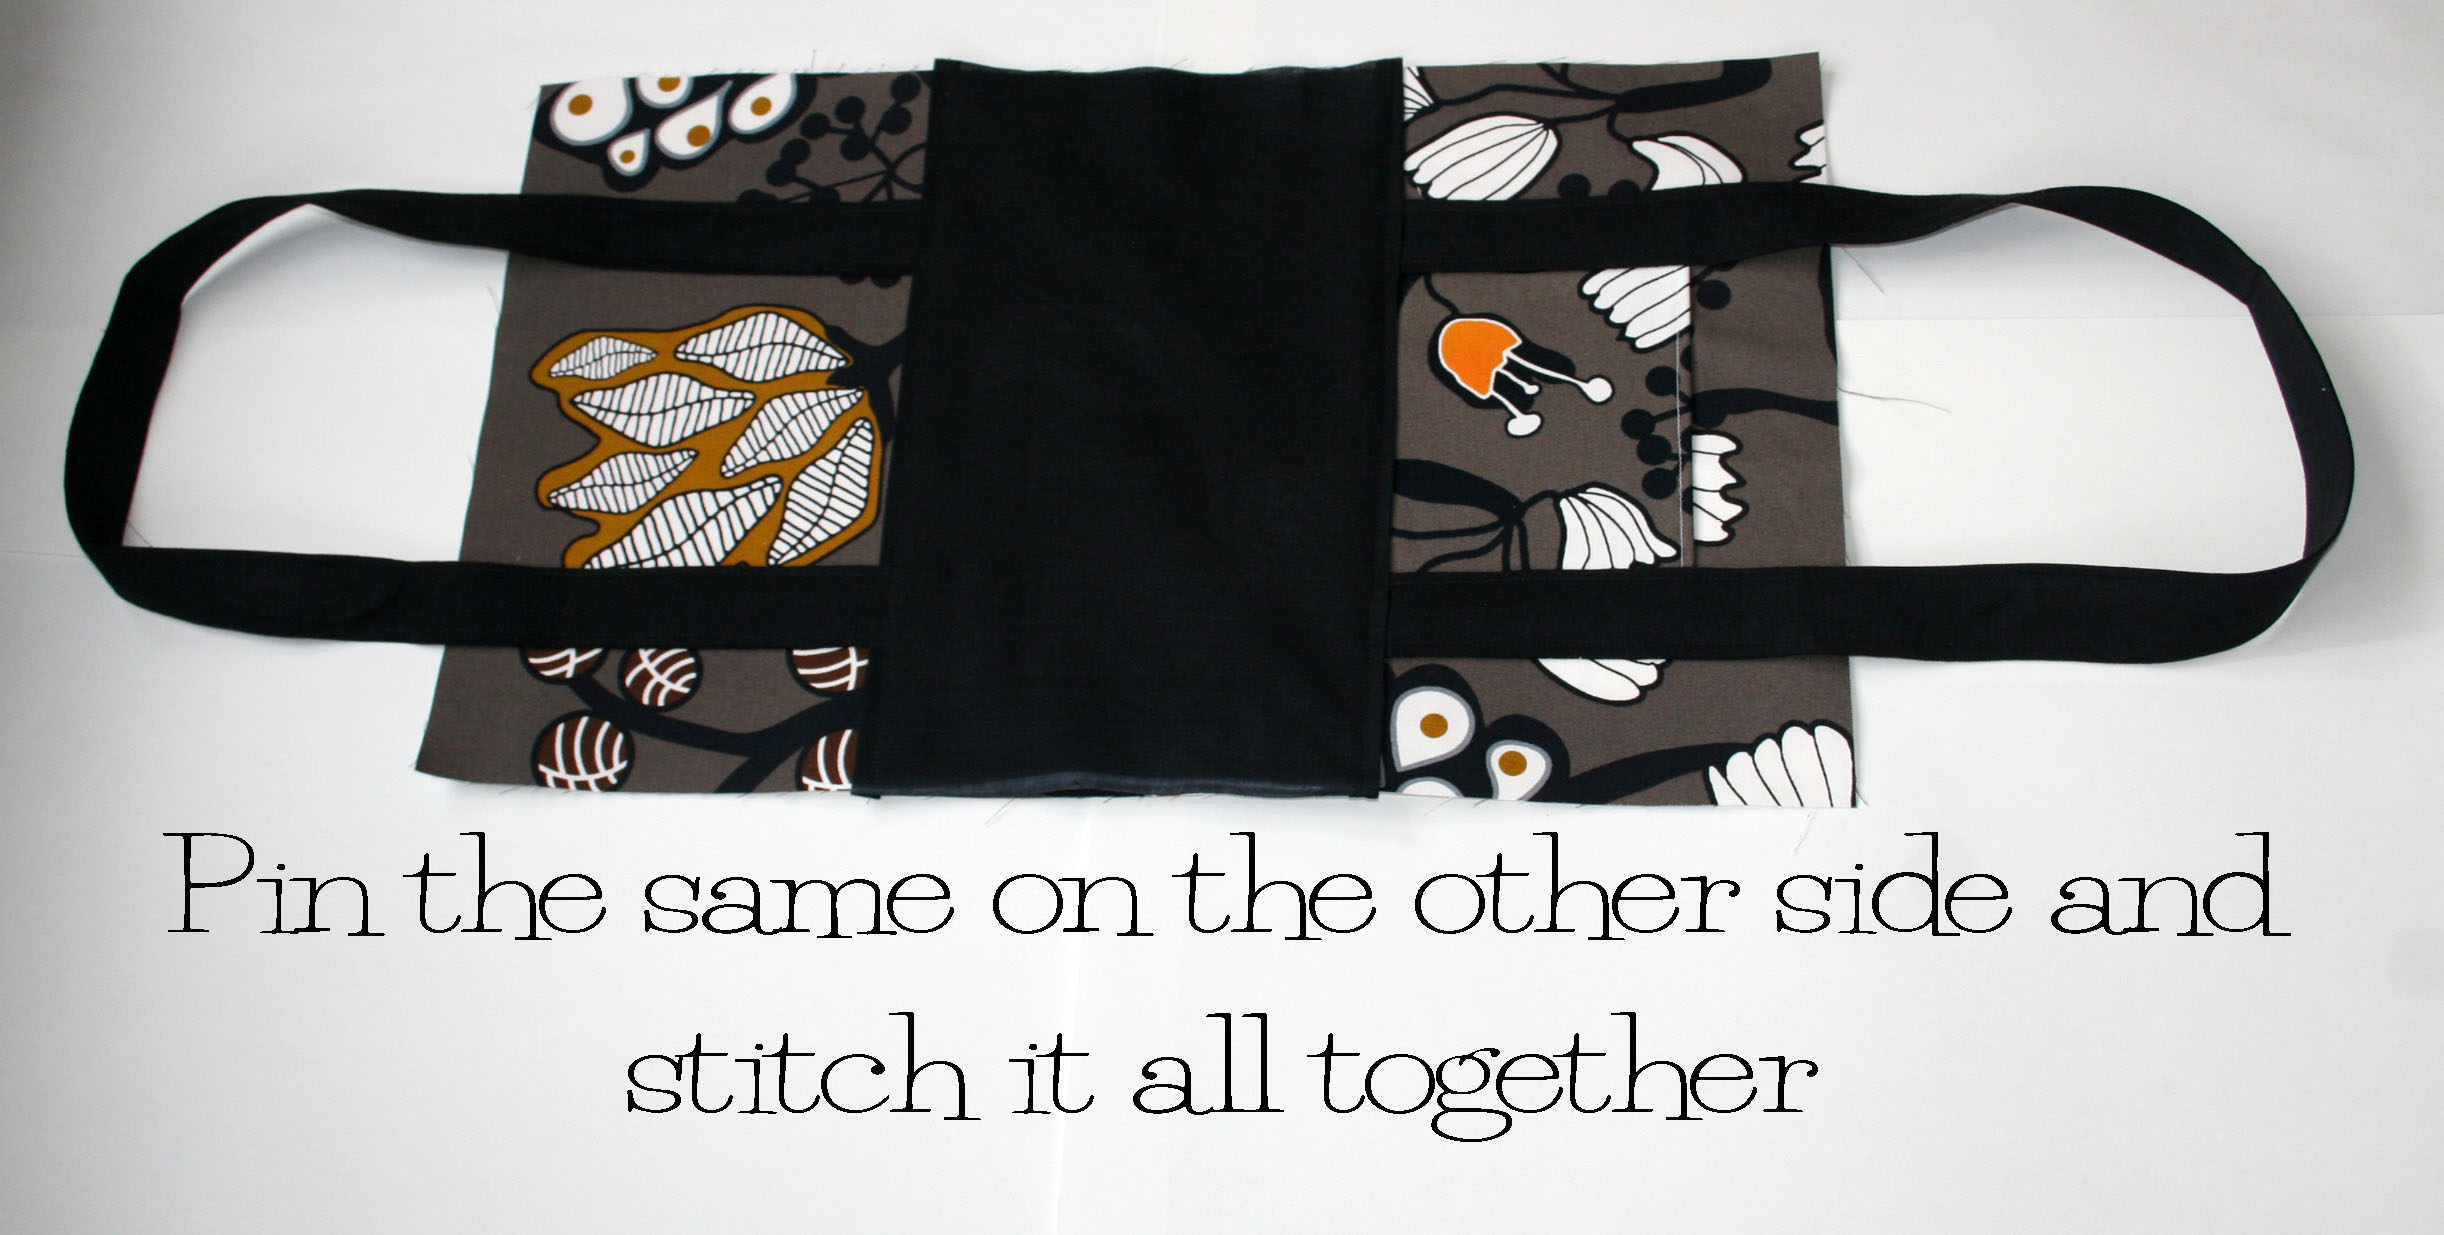
HELP! So I am a little challenged when it comes to translating what I see into when I need to do. I love your bag and am in the process of making one that is turning out beautifully but I am stuck on the sides. I sewed the contrast fabric to the main fabric for the sides like in your photo. I’m at the point where I need to attach the side pieces to the bottoms but when I do that my side piece is going to be several inches too short. Is this right? Should I just trust the process here?
My sides are definitively 4.5×11.5. I sewed the contrast pieces to the bottom of the 4.5×11.5 main side piece so that there is no overhang of the contrast. The contrast sits on top of the main side piece. I thought maybe this is where I had gone wrong but when I took my stitching apart and tried to sew the contrast with a bit of overhang from the main side piece, the contrast on the front and back of the bag doesn’t match the contrast on the side. ARGH!!!!!
I am also totally lost at “pin the side piece to the bottom piece”. It looks like you have pinned the side piece upright along with side edge of the bottom piece (am I making sense?) but that can’t be right. Can it?
Hi Toni,
When you pin the side pieces to the main body of your bag and they are laying flat in the middle, is this where they are too short? Are you concerned because they don’t go all the way across the bag when laying flat?
Are you on the fourteenth picture in the tutorial? If this is where you are stuck, then rest assured, the side pieces will not go all the way across the bottom and that’s OK. My photos don’t show that and I apologize. I hope this helps. If not, let me know and we’ll try to figure it out.
Beth
After you sew the side pieces to the main body piece, you will be wrapping the main piece around the sides of the side pieces. This is where you are sewing the four corners of the bag. I’m heading to work right now, but I’ll check when I get back to see if any of this helped. If, not we’ll keep trying to figure it out together.
Good luck,
Beth
Okay thank you thank you thank you! I was totally making it harder than it it needed to be. I was also over-thinking and getting too far ahead of each step! TRUST THE PROCESS! LOL! I am going to post a picture on a blog that I started but never kept up with just so you can see it. It’s turning out really pretty. I’ve just made a few small mistakes in lining up the contrast around the bottoms. But I don’t believe anyone will be looking that closely at my bag, especially since it is for all my church stuff. I’ll just have to pray for any smart-alec judgie-pants who notice. Right now I am about the sew in the lining. I’m just trying to figure out how to easily insert some V.Bradley style internal pockets. As soon as I finish I will post that picture. Thanks again!
I’m so glad that helped. Please let me know if you have any other questions. I’m looking forward to seeing your bag.
Beth
Could you post pics of a couple more angles of the finished bag particularly the side view – finished images really help me understand where instructions are heading if that makes sense? Like someone else poster earlier, I think I may add a couple of extra pockets inside, maybe another on the other side and a magnetic closure – I love the size and it’s probably great as is for a beach bag/shopping tote etc but I’d like to use it as a toddler nappy bag so will need a million pockets.
Great tute 🙂
Thank you, Stacey. Unfortunately I gave the bag away as a gift, but if I make another one soon, I’ll post more pictures. Sorry.
Pingback: Mend Your Jeans! | The Renegade Seamstress
Amei! Vou fazer com certeza! Obrigada por compartilhar!
Você é muito bem-vindo!
Pingback: Personalized Tote part 1 | Lisa's Buzz
Love the bag! What interfacing do you use?
Thanks! I use Pellon 808 Craft Fuse
Pingback: Personalized Tote Part 2 | Lisa's Buzz
I made a bag following your directions. Thanks for sharing!
Hi Laura,
I’d love to see a picture of your bag!
Beth
Finally just what I was looking for! I live in Germany and have ordered some oh-so-cute Amy Butler fabric (unfortunately not as cheap as the IKEA fabric…) and didn’t want to mess it up! Thanks for the instructions.
However, I had planned to made the bottom out of ‘leather’ as mine will be more of a purse and I wouldn’t want it to wrap up the sides so much. In other words, from the bottom up would be leather, contrast fabric, main fabric, bias trim – so one more step/layer. I hope I can do this! Any tips?
Good luck on your bag, I’m sure you can do it. As far as a tip, just be sure to use a leather needle 110/18 when sewing the leather. I would love to see your bag when you finish! If you’d like, you can send photos to bhunting@eoni.com.
Happy sewing!
Beth
I love this bag so much, am sure goin 2 try one 2day. Tnks 4 this one sweet *hugs*
Have fun!!!
I’m so making this this weekend. Colored Duck cloth is on sale this Thursday at Joanns in store $4.99/yd 60″ wide. Great holiday gift
Have fun, Rachel! And thanks for the “heads up” on the sale!!! Just a word of warning, though, once you make one, you might not be able to stop… 😉
Beth
I tried this pattern today and I absolutely LOVE this!! I have wanted a tote bag since forever and this is just perfect. Thank you so much for sharing this pattern!
You are so welcome!! I’m glad you had fun. I’d love to see your bag.
Hi, so I just cant follow the part where you put a side piece on the bottom contrasting piece of the bag. It looks lik you sewed the side piece upside down in the middle of the contrasting bottom piece, on both sides. And then i dont know what do do with the eeclnd side piece either… That cant be right! Lol so could you please explain to me now you did that? Its an amazing bag and I really want to make it! If I can just get straight how on earth Im going to attach the side pieces, I am so making this bag!!
Oops, typos! Where it says eeclnd I meant second! 😛
Pingback: August Recap | Stacey in Stitches
This really is a lovely bag – I found it and your lovely blog via Pinterest. I just have one query – the pattern says “Body – cut one piece” (for both exterior and contrast fabric). Wouldn’t you need two of both the exterior and contrast fabric for each side? I may be really over tied or a bit slow….. Would you cut the piece into halves? The 15″ x 25 1/2″ is pretty big. Any suggestions appreciated! Thanks! I have the fabric ready and am rearing to go!!!
Umm – I was over tired and stressed! I worked it out! Sorry to bug you! The contrast body piece lays ON TOP, and in the middle of the MAIN body piece! Double layer is a good idea for extra strength! Thanks again for a fab tutorial! x
Not sure what I’m doing wrong, when I pin the sides there’s about 4 inches extra that I have to cut off of the side panels at the top.
Are you laying the short pieces directly over the long side pieces?
I just found this post …. you continue to amaze me! Great tote and great inspiration for my next trip to IKEA. I’m so luck to have a few near me in The Netherlands.
Oh you are SOOOOOO lucky to live near an IKEA! I love that store but the nearest one to me is a four hour drive. Have fun with this tote, it really is quick and easy to make!
I made this bag but I increased the measurement of the sides to 6″. So I also increased the body to 27.5″ and the lining to 27″. The body was perfect but the lining was too tight. What should it have been??
Was it the length or the width that you increased? Also, did you take into account that you increased the sides of the body with the 6″ inch sides? So that would mean you would need to increase the lining more than the body.
It was the width. I only increased the lining by two inches, I think I should have done four. 😉
I think you might be right. That was my first thought, too. Let me know if that works.
Hey, what are the dimensions of the finished bag? 🙂
Pingback: Flo näht jetzt in Englisch – Tote Bag – | Flou.de
How long did this bag take you to make? Trying to gauge when I should work on it. 🙂
Hi Sarah,
This bag was taking me about two hours to make. I would leave a little more time for the first run through, though.
Have fun!
Beth
Love this bag! What is the outer fabric called? Which designer? I MUST have some lol 🙂
Hi Sasha! I LOVE this fabric, too! It was from IKEA a few years ago. Hope you can find some. Have a great week!
Have you ever made this tote bag with extra pockets on the inside? I was just thinking today that would be a good summer sewing project for me to have ready when I go back to subbing in the fall, but I’d need some extra pockets to “hide” stuff!!
Hi Julie,
I haven’t ever made it with inside pockets, but that is a wonderful idea! Have fun with this and i’d love to see your bag when you’re finished!
Beth
Just made this tote bag from your excellent instructions, thank you! It looks great!
Oh, I’m so happy you like it Stina! I’ve made so many as gifts for friends that they started to call them “Beth Bags”. Hope you had as much fun making it as I had making the tutorial for you. Enjoy the rest of your week!
Hi, I found this tutorial last week and quickly made one. It’s fantastic and I tried it out at the markets this morning and it fit so much :-). It took about three hours to make (with a toddler trying to help) but I’m sure I’ll make them quicker in future. I also sewed the lining to the body right sides together and then turned inside out so I didn’t have to use binding which is my nemesis.
Thank you for such a wonderful tutorial!
What are the measurements for this bag? I love the look of this and I can always extend if needed but wanted to see how tall it was first. Did it have an inside pocket also?
I was wondering what the final dimensions were for this bag as well. Thanks!
Im planning on shopping for fabric this weekend but i am wondering if I choose a heavy weight fabric do I need to use the fusible interfacing? is this just to hold the lining to the body or to add structure?
Hi Jessica. The fusible interfacing is for structure. Hope you find some nice fabric! Have fun!
Hi,
And thanks for this. I plan to try my version as soon as I get some fabric. I might add some magnet for closing but otherwise your tutorial seems easy enought. Only thing were the dimensions since we use metric system here in Finland, so I had to convert the dimensions into centimeters. Hopefully the patterns still work ok. I think this shall be great project for coming Twelfth Day on 6th of January.
Just finished my bag and I´m really pleased how it turned out.
Few questions though; does your cutting patters include steeks or some additional measures for seams. Some tips also for how to make this bag with zipper or other closing method would be nice.
I was thinking to make paper patters for this because I know I shall make other versions with different fabrics.
Thank you for this great tutorial.
You are so very welcome, Lea! I did include the seams in the measurements, so no need to add any if you make a paper pattern.
Going to Disney in September,making it out of classic Mickey plaid. Will post when finished!
Is there a link to print this tutorial?
Hello from Canada!
I just finished this bag. Looks great.
I had to redo the sides because I had placed the contrasting fabric at the end and not on top of the side pieces. But now, it’s perfect. It is a teacher year end’s gift. I am quite sure she will love it. My fabric is light gray with large paisley and funky brown flowers intertwined with some black.
Thanks for the tutorial. The second one I will make (yes I will make another one), will be much faster to make.
Thank you very much for the great tutorial! I’m going to try this one with similar (Ikea) fabric. One small question though: do I have to use fusible interfacing??
No, being able to iron it onto the fabric just makes it easier. If you don’t have fusible interfacing, you can use regular.
So sorry! I didn’t quite understand the word fusible. Looked it up in a dictionary and it’s completely clear now, so no need to answer my question…
Oops, I already did. 🙂
I have given this back to the teacher, as it was planned. She was verrrrrrrry happy. My son met her a few weeks ago, and sure enough, she was using it. Said she takes it everywhere. Thought I’s give you a heads up! thank you again Renegade.
You are so very welcome! I’m happy that she liked it and you were so kind to make one for her!
Pingback: The Renegade Tote Bag - Free Sewing Tutorial | PatternPile.com - sew, quilt, knit and crochet fun gifts!
I’ve seen it asked several times, but must have missed the answer. I’d like to make this tote for a vintage sewing machine. What are the finished dimensions of this tote?
I need your help
I am trying to make a tote bag just like yours
I loved it
I am a beginner so I am little confused the exterior fabric is 15 inches wide by 25 long
But the bottom piece is 15 wide by 10.5?
In your picture they look like they are the same size
Did I do something wrong?
You are actually putting the bottom piece over the exterior fabric and pinning it in place.
Last year, I made this bag as a thank you gift for my grandaughter teacher. My son met her last winter when picking up his daughter and she still had the bag with her. She said she uses it daily. She thought it was store bought. My son told her that I had made it. I had use decor fabric from Fabricville.
Now, the time is coming for two more. One for this year’s teacher and one for the lady who’s in charge of my little one after school. This time, I will send you a photo. I just love that pattern, and I am looking to modify it to include a zipper at the top.
Cute bag.
I am so impressed with all of your recycled makeovers. What a gift you truly have and thanks so much for sharing. I am really excited to see what I can learn from you.😀
I’m so confused! The picture says “pin the side piece to the bottom piece” the picture looks like there is a separate bottom piece with interfacing but the cuts listed only have one large piece for the entire body.
I see people asked the final dimensions but I never saw an answer for that. Could you please list them? Thank You
I am going to have to make this and post the dimensions myself I guess…..
Hi
Oh my gott the tote bag is the most cutiest thing l have ever seen. Love and will try to make one.
Though am a beginner.
Thanks for this wonderful post.
Thanks so much for this pattern! I am a beginner and was able to make this in one evening!
You are so very welcome Joleey! I’d love to see your bag. 🙂
Hi, I did not see the answer to all the questions about the final dimensions. Did you post it somewhere and I missed it?? Would you please repeat the answer? Thanks
Thank you! I just made this as a gift and it looks awesome 🙂
Oh you are so very welcome Star! I’m so happy this was helpful to you.