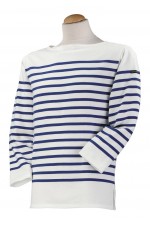
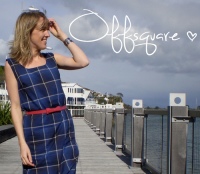
So what does a DIY girl such as myself do when they are feeling nautical?
Refashion of course!
Start with a thrift store t shirt.
First, alter your shirt to fit if need be.
(You can find a resizing tutorial here.)
Then for stability and a flat painting surface, slip cut to fit cardboard inside shirt and sleeves.
On the front and back of the shirt and sleeves, draw a line every inch using a fabric marking pen and clear ruler.
Use a small brush to paint your lines.
I used Tulip brand Soft Fabric Paint in Marine Blue. I did water it down a bit. One and a half ounces of the paint did the trick.
Choose a few wooden buttons for the shoulders.
I was lucky enough to get a visit from the Button Fairy a few months ago.
I found three buttons I like and sewed them on one shoulder.
And now I’m ready to launch!!.
I could have bought this shirt at Saint James for $130.00
But instead, thanks to Justine at Sew Country Chick I was inspired to make my own for $1.50.
Priceless! Thanks Justine!!
Some more refashion tutorials you might like:


Just wanted to say I love seeing all your creations! Can’t wait to see the next awesome thing you create. Well done!
Thank you so much Alice. Your kind words mean a lot to me!
Beth
Love following your blog; always inspiring! Just nominated you for the Versatile Blogger award. Check it out here: http://ipinterest.me/2012/06/16/the-versatile-blogger-award/
Thank you so much for the nomination! I’m really enjoying your blog, too!
Beth
Looks great Beth! You would look cute next to Gigi!
Thanks for the inspiration!!!
You are one smart cookie!! This refashion is so clever and cute, as are the rest of them. You need to offer your own Craftsy refashion course – seriously!
Thanks so much Sarah!
I’ve been putting my tutorials on Craftsy, but I haven’t thought of actually teaching a course. Maybe I should look into it. That would be right up my alley! Enjoy your Sunday.
Beth
Fantastic! Love it. Today is the day (unless something happens) that I make the bleach pen shirt!
Oh YAY! I can’t wait to see it!
okay, now I have another question after reading your response above…..what is Craftsy?
It’s a great website with loads of free tutorials and paid courses. You can download your own projects or save others. I highly recommend it. It’s loads of fun.
Here’s a link:
http://www.craftsy.com/project/view/DIY-Nautical-Striped-Shirt/46798
Thanks! I’ll check it out!
Fabulous, as always!
Thanks Jenny!
Ahoy! Permission to step aboard? 😉
Too, too cute! Those buttons embellish the design perfectly.
Aye, come aboard anytime, Cara!
You always amaze me!
Thank you Kelly!!!
This looks great! I love your blog posts – they are clever AND visually pleasing! Thank you for sharing! x
Oh, thanks so much for the encouragement! I have so much fun doing this from start to finish. Then the icing on the cake is getting to know people like you.
Enjoy the rest of your Sunday!
Beth
It’s a wonderful thing to have people ask you where you bought your shirt and you be able to say “I made it”- I would totally ask you if I saw you on the street or in the mall. I really enjoy your posts. I’m a fan!
Ahoy…very ship-shape! And making one should be smooth sailing, thanks to your excellent tutorial!
Cute! You are set to go boating~
Let’s set sail soon!!!!
Very cool creation again and again, it’s unending. Of course, because you are really creative and talented. Love them all!!
I’m blushing!!!!!
I LOVE this idea… am off to find a plain shirt to update and i KNEW I had all those buttons for some reason!
Oh I hope you find one and I’d love to see it when you’re finished!!!
Beth
You are living proof that its possible to look totally stylish even when on a budget. LOVE your projects! 🙂
Thanks so much! Budgets can be fun!!!!!
Love the nautical theme. Awesome!
Thanks!
This is a great idea! I’m just getting into thrifting, so this is next on my list on projects. Thanks for sharing!
Great tutorial and idea. I’ve seen shirts like this out in the stores… yours looks very similar. Good job!
Pingback: DIY T Shirt Dress | chic envelopements
Pingback: OK, so about that pink belt…… | chic envelopements
Pingback: DIY Ruched Maternity Shirt Tutorial | chic envelopements
This is awesome! I’ll have to try…by the way I love the new name of your blog!
You are my new hero!!!!
You are so sweet, Shannon!
clever and fabulous!
Thanks!
Your a genius!!!! I love your before and afters. Your very creative. Now I can repurpose some of my outdated clothes.
Well, aren’t you sweet, Marnie! Thank you, what a nice way to start my morning. Have fun!